CPU Particle Systems

Post Mortem
I wrote this post back in 2013, when I was still learning about a lot of FX related topics (and graphics programming, and programming in general...). Most of what you see below has aged pretty well and concepts still apply, but some has not! Take ideas that you find useful, and leave the rest. For example when I wrote this, I was pretty bad at paying attention to cache efficiency. Most of the effort was in working with a relatively well-defined memory budget, and how to construct something that fit within it - something that was at the forefront of my thought process from what I was learning at work. Always a learning process!Table Of Contents
IntroductionSome Industry Background
Particle System Archetypes
Working with FX Artists
Particle System Architecture Overview
Memory Management
Particle Memory Pool
Particle Memory Manager
Particle Manager
The Particle Update
Multithreading The Update Loop
Animation
Particle Emitter Properties and the Update Loop
Optimizing the Update Loop
Extract Unnecessary Recalculation
Make Good Decisions about Pool/Job Count
Level Up Big-Time with SIMD
Rendering
The Master Particle Vertex Buffer
Sorting
Blending
Particle Emitter Rendering
Shading
Vertex Shader
Pixel Shader
Performance
Use-Case Statistics
Screen Fill vs. Particle Count
Why Not Use GPU Particles?
Memory
Beyond The Engine
Templating
Creating a Worthy Editor
The End Result
References & Resources
Introduction
Building and growing a solid particle system can be a bit of an undertaking, but it's also very rewarding! My hope is that, by the end of this post, you'll have a solid understanding of what it takes to build usable, extendable, and efficient particle system software. I'm going to be covering overall particle system architecture, the update loop, rendering, animation, memory management, and much more.Some Industry Background
It just happened to work out this way, but so far, I've spent a lot of my professional time writing and expanding particle and effects systems for game studio art teams. First I was at Turbine working on LOTRO, DDO, and Infinite Crisis, and now I'm at ZeniMax working on ESO. If you're familiar with those games, then you'll also notice that I've spent all my time on fantasy MMOs and MOBAs - both of which require very rich and diverse particle systems. It's not something I realized before speaking to a number of graphics programmers at other studios, but studios that develop single player and standard multiplayer games tend to have much more specialized particle system needs than MMO games. MMOs (especially in the fantasy genre) simply require more diversity in their effects. In this post I'll be speaking from the MMO developer point of view. Probably very little of what I'm going to cover is specific to MMOs, but it may help to contextualize where I'm coming from.Particle System Archetypes
I typically classify particle systems as one of two different archetypes, which will make more sense later, but it's worth talking about beforehand. I call the first archetype the bread and butter particle system. This type of particle system covers all your general effects, such as:- - Fire
- - Smoke
- - Rain
- - Ambient Dust
- - Snow
- - Sparkles
And many more. The second archetype is what I call the custom-construction particle system. This type of particle system covers all specialized effects, and usually requires dynamic mesh creation. From what I've seen, these kinds of effects are typically programmed to each have their own type of system rather than being in one category. Although this may seem convenient when building them, I don't feel like it works out in the long term, but that's for another post. These include effects such as:
- - Beams
- - Streaks (aka Ribbons, Trails)
- - Mesh Particles
- - Lightning
- - Complex Weather
- - Projections
This post would be too big to cover both of these, so I'm only going to cover the bread and butter archetype here. I will definitely get around to covering custom-construction in the future.
Working with FX Artists
Artists are some of the coolest people you'll ever get to work with. FX Artists in general will blow your mind, because they can use even the most feature-limited particle systems and still make fantastic effects. Artists are incredibly clever, and if they have an effect they need to make, you can bet that they'll use the features you've provided in ways you never expected (or intended) to get the job done. That being said, our goal is to minimize the amount of time they spend to create these effects by providing tons of controls and features. We're going to do so by following some assumptions and sweeping generalizations:- - Artists want every single feature exposed to them. Got a magic number? Give the artist control to edit it. Have part of a feature you think they don't need? Give artists control. Artist says it's "probably not something we'll need"? Give artists control.
- - Artists want to be able to animate everything. From positioning, materials, rotation, velocity, colors, etc., your artists will want to be able to animate everything about your particle system. Furthermore, 'startValue' and 'endValue' are not enough, they need to be able to animate further than that.
- - You will never have enough features. Ask any FX artist about [XYZ] particle system that they've worked with, from in-house engine to Unreal 4, and they'll be able to give you a laundry list of features they wish it had. That's okay, especially because their creativity will carry you the rest of the way. No engine can have everything, but let that be a lesson of encouragement for you to be active in asking them about the kinds of features they want. There's an endless set of features you can add, so never stop building!
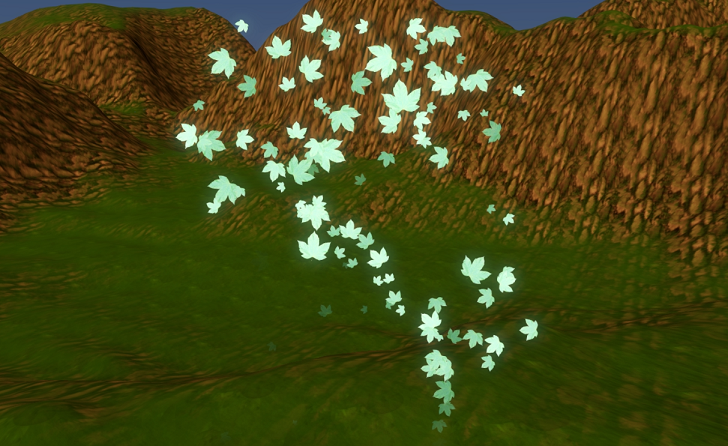
 Look how happy these FX artists are now that you're learning how to make good particle systems! Probably.
Particle System Architecture Overview
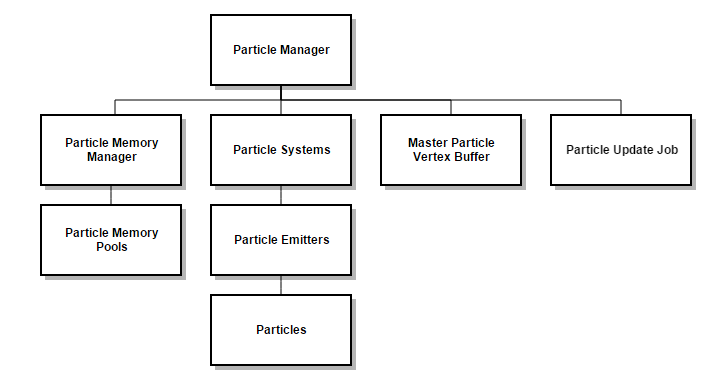 Above, you'll see the general architecture of what I use for handling all things particle related. I'll start with an overview and dig into what each
of these pieces do. Starting with the Particle Manager, it handles the top-level update and rendering loop calls. It also handles initializing the memory
manager, holds the master particle vertex buffer, holds the arrays of particle systems, and is what kicks off threaded update jobs. Below this is the
memory manager itself, which keeps a number of memory pools that house pre-allocated particle systems, emitters, and particles. Particle systems themselves
manage an array of particle emitters, which in turn house much of the particle update logic, and the particles themselves. The master particle vertex
buffer is just how it sounds, a single vertex buffer with size enough to hold all particles that we can have. The particle update job is also worth
mentioning here, because it's how we split up our particle update loops onto different threads.
Above, you'll see the general architecture of what I use for handling all things particle related. I'll start with an overview and dig into what each
of these pieces do. Starting with the Particle Manager, it handles the top-level update and rendering loop calls. It also handles initializing the memory
manager, holds the master particle vertex buffer, holds the arrays of particle systems, and is what kicks off threaded update jobs. Below this is the
memory manager itself, which keeps a number of memory pools that house pre-allocated particle systems, emitters, and particles. Particle systems themselves
manage an array of particle emitters, which in turn house much of the particle update logic, and the particles themselves. The master particle vertex
buffer is just how it sounds, a single vertex buffer with size enough to hold all particles that we can have. The particle update job is also worth
mentioning here, because it's how we split up our particle update loops onto different threads.
Memory Management
We'll start by taking a look at how we can manage all the memory we're going to need to run our particle systems effectively.Particle Memory Pool
I'm starting here because the particle memory pool is the basis for how a lot of other things get managed. The high level view is that we're going to have several pre-defined limits for the maximum number of particle objects we can have, and the ParticleMemoryManager will split those up into X number of memory pools. Setting these hard limits is good for several reasons:- 1) We know exactly how much memory will be allotted for particle-related things.
- 2) We can pre-allocate all the particle memory we'll need up-front at load time
- 3) We can keep ourselves from going too crazy with our particle counts. Although you may think this is something that everyone should just be mindful of to begin with, that's definitely not always the case.
What's contained in it is really simple:
uint32 mMaxParticles;
uint32 mMaxParticleEmitters;
uint32 mMaxParticleSystems;
uint32 mCurrentParticleIndex;
uint32 mCurrentEmitterIndex;
uint32 mCurrentSystemIndex;

ParticleSystem *mParticleSystems;
ParticleEmitter *mParticleEmitters;
Particle *mParticles;

DynamicArray < Particle* > mReusableParticles;
DynamicArray < ParticleEmitter* > mReusableEmitters;
DynamicArray < ParticleSystem* > mReusableSystems;
As you can see, I've got three arrays for the particle systems, emitters, and particles themselves. I then have three dynamic arrays (equivalent of the std::vector) for storing reusable particles, emitters, and systems. And of course, I have counters for the current index of the next available particle/emitter/system, and maximum sizes for the arrays.
The reusable arrays function like this: every time we 'free' a particle/emitter/system, the pointer to its address is stored in the appropriate reusable array to be used again when needed. Using arrays for the objects instead of a DynamicArray is intentional, because although I never expect the array to grow (as you'll see), if it did, it would stomp all the memory being pointed to by the reusable arrays. Using a dynamic array for the reusable objects is also intentional, because I want to allow these to grow to their natural sizes while the game is running, which can be a decent amount less than the size of its corresponding array.
The ParticleMemoryManager initializes each memory pool with its maximum number of particles, emitters, and systems. Then, when a new particle (for example) is requested, we first check the array for a new one. If those have all been used, we check the reusable array, like so:
Particle *ParticleMemoryPool::GetNewParticle()
{
	Particle *newParticle = NULL;

	if (mCurrentParticleIndex < mMaxParticles)
	{
		newParticle = &mParticles[mCurrentParticleIndex];
		mCurrentParticleIndex++;
	}
	else if (mReusableParticles.CurrentSize() > 0)
	{
		newParticle = mReusableParticles.RemoveLast();
	}

	return newParticle;
}
This will intentionally return NULL when we can't find any particles, which we'll handle in the particle emitter logic. Then, when we want to free a
particle, we do this:
void ParticleMemoryPool::FreeParticle(Particle *particle)
{
	particle->Reset();
	mReusableParticles.Add(particle);
}
This simply resets the particle member variables to their defaults, and we add it to the reusable particle array. I do the exact same thing with the
other structures. You'll notice that the point of having these two arrays is so we can have O(1) access for whatever we need to do. If we're getting
a new particle from the array, that's O(1) because we store the next index to use. If we're getting a new particle from the reusable array, we remove
the last element (which returns the last array element and decreases the array's size by 1 without deallocating memory), which is O(1). Freeing is as
simple as adding to the reusable array, also O(1). So now we've got fast access for new particle objects all stored in contiguous memory, fast freeing
of particle objects, and (aside from the reusable arrays resizing a few times) effectively zero game-time allocation and deallocation.
Particle Memory Manager
The ParticleMemoryManager class simply maintains the array of memory pools, and is in charge of choosing the best memory pool for new particle systems. It is initialized by dividing up the number of allotted particle objects by the number of memory pools.
void ParticleMemoryManager::Initialize(uint32 numParticles, uint32 numEmitters, uint32 numSystems, uint32 numPools)
{
	for (uint32 i = 0; i < numPools; i++)
	{
		mMemoryPools.Add(new ParticleMemoryPool(numParticles / numPools, numEmitters / numPools, numSystems / numPools));
	}
}
So, why are we splitting these up into different pools to begin with? The reason is because we're going to be splitting the particle systems into a number
of groups so that we can update them on separate threads. In order to avoid any potential issues with threads accessing the same memory, we give each
group its own memory pool. There's really no disadvantage to doing this, and it keeps the threading complexity nice and simple. The ParticleMemoryManager
itself is implemented as a singleton, so when an emitter wants a new particle for example, it looks like this:Particle *newParticle = ParticleMemoryManager::GetSingleton()->GetMemoryPool(mPoolId)->GetNewParticle();The particle systems and particle emitters keep track of their pool IDs so that they can get new emitters and particles from the correct pools (you'll see more on this later). The ParticleManager, when asked to create a new particle system, will ask the ParticleMemoryManager for the appropriate pool ID that it should use. Right now, I just base this on which pool is currently the lightest on particle count:
uint32 ParticleMemoryManager::GetBestPoolIdForNewParticles()
{
	uint32 bestId = 0;
	uint32 lowestParticles = mMemoryPools[0]->GetNumActiveParticles(); //we'll always have at least one

	for (uint32 i = 1; i < mMemoryPools.CurrentSize(); i++)
	{
		uint32 numParticles = mMemoryPools[i]->GetNumActiveParticles();
		if (numParticles < lowestParticles)
		{
			bestId = i;
			lowestParticles = numParticles;
		}
	}

	return bestId;
}
This ID is then assigned to the new particle system in the ParticleManager, and the system in turn assigns its ID to any emitters it spawns. This
ensures that all memory from a particle system, down to its emitters and particles, come from the same memory pool. That's about all there is to
cover for the ParticleMemoryManager, let's loop back to the ParticleManager.Particle Manager
The ParticleManager handles everything at the big-picture level. It holds the array of arrays of particle systems, the master particle vertex buffer, and handles the main render and update loops. In this file, we also have the defines for how we're going to set up the memory pool manager:#define DEFAULT_MAX_MEMORY_MANAGER_PARTICLES 50000 #define DEFAULT_MAX_MEMORY_MANAGER_PARTICLE_EMITTERS 1000 #define DEFAULT_MAX_MEMORY_MANAGER_PARTICLE_SYSTEMS 1000 #define DEFAULT_NUM_MEMORY_POOLS 8These can be swapped out for some user-defined things as well; this is just to get us started. As I mentioned, we also have our arrays of particle systems, and our vertex buffer:
DynamicArray < ParticleSystem* > mParticleSystems[DEFAULT_NUM_MEMORY_POOLS];
ParticleVertexBuffer *mMasterVertexBuffer;
I'll get to the vertex buffer later on. Notice that I keep DEFAULT_NUM_MEMORY_POOLS amount of particle system arrays. We need to make sure we separate these particle systems into pools based on how many memory pools we have, so that each thread-local memory pool is accessed by only its designated pool of particle systems.
In the setup of the ParticleManager, we initialize both our particle memory manager, and our master vertex buffer.
ParticleMemoryManager::GetSingleton()->Initialize(DEFAULT_MAX_MEMORY_MANAGER_PARTICLES, DEFAULT_MAX_MEMORY_MANAGER_PARTICLE_EMITTERS,
		DEFAULT_MAX_MEMORY_MANAGER_PARTICLE_SYSTEMS, DEFAULT_NUM_MEMORY_POOLS);

mMasterVertexBuffer = new ParticleVertexBuffer();
mMasterVertexBuffer->Initialize(mGraphicsManager->GetDevice(), DEFAULT_MAX_MEMORY_MANAGER_PARTICLES, DEFAULT_NUM_MEMORY_POOLS);
This gets all our memory pools setup, and our vertex buffer for rendering. The main render loop for the particle manager will be covered in a later section. For now it's time to check out the update loop, where we'll finally get to see why we spent all that time on setting up those pools.
The Particle Update
For this section, I'll be covering all the pieces involved with updating particle systems, including multithreading, animation, emitter properties, and more.Multithreading The Update Loop
void ParticleManager::Update(float deltaTime, const Vector3 &cameraDirection)
{
	mMasterVertexBuffer->ClearParticleVerts();

	JobBatch jobBatch;

	ParticleUpdateJob particleUpdateJobs[DEFAULT_NUM_MEMORY_POOLS];
	ParticleUpdateJob *mainThreadJob = NULL;

	for (uint32 p = 0; p < DEFAULT_NUM_MEMORY_POOLS; p++)
	{
		if (mParticleSystems[p].CurrentSize() > 0)
		{
			particleUpdateJobs[p].ParticleSystems = &mParticleSystems[p];
			particleUpdateJobs[p].DeltaTime = deltaTime;
			particleUpdateJobs[p].CameraDirection = cameraDirection;
			particleUpdateJobs[p].CameraPosition = cameraPosition;
			particleUpdateJobs[p].VertexBuffer = mMasterVertexBuffer;

			if (!mainThreadJob)
			{
				mainThreadJob = &particleUpdateJobs[p];
			}
			else
			{
				jobBatch.AddJob(&particleUpdateJobs[p]);
			}
		}
	}

	ThreadPoolManager::GetSingleton()->GetThreadPool()->AddJobBatch(&jobBatch);

	if (mainThreadJob)
	{
		mainThreadJob->Execute();
	}

	jobBatch.WaitForBatch();
}
In my engine, I use a job-based multithreading system with a worker thread pool to process the jobs. This is a pretty common practice that is covered
thoroughly online, and there are plenty of other ways to do this, so I won't be covering what goes on under that hood here. It's also a topic on its own,
but if you'd like the code for it, feel free to send me an email and I'll happily share it. The important thing for you to do is to hand the separate
particle system pools to your different threads, so that each processes a single pool.
Back to the code! I start by clearing out the vertex buffer (since we'll be rebuilding it with updated particle verts each frame). Then, I create a number of particle update jobs based on how many pools were created, and a pointer for one to process on the main thread. Now I just loop through each grouping of particle systems (remember, there's one group of these for each memory pool), and assign each one to a job. Notice that I check to make sure each grouping actually has particle systems in it, otherwise I would waste time waking up a thread for nothing. Next, I check if I've got a job for the main thread. We'll want to make sure the main thread has something to do while the other threads do some processing, which is why we do this. The first valid job gets assigned to the main thread, and the others are added to the job batch. AddJobBatch auto-executes the jobs on the other threads, and we execute the main thread job right after we kick that off. Then, we wait for the job batch to complete, and we're done!
The particle update job itself is quite simple. It inherits from "Job" which is just an empty class with a pure-virtual Execute() function. It contains all the properites needed to actually update a particle system, and does so by looping through each one. It also frees the memory of a particle system back into the memory pool when it needs to, and this is completely safe because only one thread ever makes changes to a specific pool.
class ParticleUpdateJob : public Job
{
public:
	DynamicArray < ParticleSystem* > *ParticleSystems;
	float DeltaTime;
	Vector3 CameraDirection;
	Vector3 CameraPosition;
	ParticleVertexBuffer *VertexBuffer;

	virtual void Execute()
	{
		for (int i = 0; i < ParticleSystems->CurrentSize(); i++)
		{
			ParticleSystem *particleSystem = (*ParticleSystems)[i];
			particleSystem->Update(VertexBuffer, DeltaTime, CameraDirection, CameraPosition);
			if (particleSystem->IsComplete())
			{
				ParticleMemoryManager::GetSingleton()->GetMemoryPool(particleSystem->GetMemoryPoolId())->FreeSystem(particleSystem);
				ParticleSystems->Remove(i);
				i -= 1;
			}
		}
	}
};
It was a lot of set up in order to get here, but the multithreading logic has become very simple as a result. The simpler it is, the (hopefully)
less error-prone it will be, and the easier it is to maintain.
Animation

Remember how I said artists want to animate everything? We're going to tackle that next before we cover the particle emitter update code, because we're going to create a class for animating values that will be used a lot.
Enter the AnimatedValue templated class, which will allow us to animate any kind of value over time. It will do so by storing an array of time/value keyframes and interpolating between them. This is a very important core feature to have. All too often I see particle systems, even professional ones, that only provide a single start value and end value to interpolate between. Like color for example, I'll see "StartColor" and "EndColor" and the system will lerp between them. That's really not enough, as any artist will want much more control than that to create interesting effects. Thankfully, a simple keyframe system is actually pretty easy to set up. Let's look at what one of these keyframes looks like.
templateAnimatedValueKey is pretty simple, it stores a time, and a value for said time. It has less-than greater-than operators so that arrays of AnimatedValueKey can be sorted by their time. Now let's look at how we'll use these. What we store in the AnimatedValue class is the following:class AnimatedValueKey { public: AnimatedValueKey() { Time = 0; Value = T(); } AnimatedValueKey(float time, T value) { Time = time; Value = value; } float GetTime() { return Time; } T GetValue() { return Value; } void SetTime(float time) { Time = time; } void SetValue(T value) { Value = value; } bool operator > (const AnimatedValueKey& right) { return Time > right.Time; } bool operator < (const AnimatedValueKey& right) { return Time < right.Time; } private: float Time; T Value; };
bool mLoop;
float mCurrentTime;
DynamicArray < AnimatedValueKey < T > > mKeys;
We just need a flag for whether or not we want an animated value to loop, a value to store the current time on the timeline, and of course an array of AnimatedValueKey. We initialize like so:
AnimatedValue()
{
	mLoop = false;
	mCurrentTime = -1.0f;
}
Then we add any number of keys to it, and every time we add a key, we quicksort the array of keys to keep them in order. Note that it's okay that we're
doing this much work when adding keys because the end-goal (though not covered here) is to have these saved and loaded from files. We shouldn't need to
create dynamic AnimatedValue timelines on the fly, and this will allow us to load up AnimatedValues quickly (pre-sorted), and to use similar animations
in many places rather than artists needing to recreate them every time they need the same ones again. I'll cover this more in the templating section.
Anyway, back to adding keys:
void AddKey(float time, T value)
{
	mKeys.Add(AnimatedValueKey < T > (time, value));
	QuickSort < AnimatedValueKey < T > >(mKeys.GetInnerArray(), 0, mKeys.CurrentSize() - 1);
}
GetInnerArray is just grabbing the DynamicArray's backing array, you should sort your array class in ascending order however works best for you. Now we'll
need a way to get the previous and next frame for a given time so we can interpolate between them. I do so like this:
void GetAnimationFramesForTime(float time, uint32 &prevFrame, uint32 &nextFrame)
{
	uint32 begin = 0;
	uint32 end = mKeys.CurrentSize() - 1;

	while (begin != end)
	{
		int middle = (begin + end) / 2;
		if (mKeys[middle].GetTime() < time)
		{
			begin = middle + 1;
		}
		else
		{
			end = middle;
		}
	}

	prevFrame = begin > 0 ? begin - 1 : 0;
	nextFrame = begin;
}
Since our keys are sorted by time, it's just a simple binary search to find the frames. Next, we'll need two ways of getting a value out of our timeline,
because certain animations make more sense one way or the other. The first is to get the value when you're provided a time value that represents a specific
time on the timeline. The second is to return the value when provided a time delta that you add to the current frame time. Let's start with the first:
T AnimatedValue::GetValueForTime(float time)
{
	uint32 numKeys = mKeys.CurrentSize();

	if (numKeys < 2)
	{
		return T(); // we need to have at least 2 keys
	}

	if (time <= mKeys[0].GetTime())
	{
		return mKeys[0].GetValue();
	}

	if (time >= mKeys[numKeys - 1].GetTime())
	{
		return mKeys[numKeys - 1].GetValue();
	}

	uint32 prevFrame = 0;
	uint32 nextFrame = 0;

	GetAnimationFramesForTime(time, prevFrame, nextFrame);

	float timeBetweenFrames = mKeys[nextFrame].GetTime() - mKeys[prevFrame].GetTime();
	float percentageThroughFrame = (time - mKeys[prevFrame].GetTime()) / timeBetweenFrames;

	T keyValue = mKeys[nextFrame].GetValue() * percentageThroughFrame + mKeys[prevFrame].GetValue() * (1.0f - percentageThroughFrame);

	return keyValue;
}
First we just make sure there are at least two keys, because there should always be at least that many (a start and an end). Next we validate that the
time is somewhere between our first and last frame times, and return values appropriately. Then, as we saw right above this, we do a search to find the
previous and next frame for this time value. Finally, we do a simple linear interpolation between the two frames to find the current value and return it.
We could easily extract this linear interpolation later and add functionality to select what kind of interpolation we want, like making the interpolation
exponential, logarithmic, etc.
T AnimatedValue::GetValueByDelta(float delta)
{
	uint32 numKeys = mKeys.CurrentSize();

	if (numKeys < 2)
	{
		return T(); // we need to have at least 2 keys
	}

	float firstFrameTime = mKeys[0].GetTime();
	float lastFrameTime = mKeys[numKeys - 1].GetTime();

	if (mCurrentTime >= lastFrameTime)
	{
		if (mLoop)
		{
			mCurrentTime = firstFrameTime;
		}
		else
		{
			return mKeys[numKeys - 1].GetValue();
		}
	}

	if (mCurrentTime <= firstFrameTime)
	{
		mCurrentTime = firstFrameTime + delta;
		return mKeys[0].GetValue();
	}

	uint32 prevFrame = 0;
	uint32 nextFrame = 0;

	GetAnimationFramesForTime(mCurrentTime, prevFrame, nextFrame);

	float timeBetweenFrames = mKeys[nextFrame].GetTime() - mKeys[prevFrame].GetTime();
	float percentageThroughFrame = timeBetweenFrames <= 0 ? 0 : (mCurrentTime - mKeys[prevFrame].GetTime()) / timeBetweenFrames;

	T keyValue = mKeys[nextFrame].GetValue() * percentageThroughFrame + mKeys[prevFrame].GetValue() * (1.0f - percentageThroughFrame);

	mCurrentTime += delta;

	return keyValue;
}
The second way to use these will be to use our frame time as the input. Most of this logic is the same as before, but instead uses mCurrentTime, which is
incremented by the delta time with each call. There's also some logic to control looping, because we'll definitely want the ability to allow these to loop
later on. That's it for this! Now we have a structure that can replace what would normally be constant particle emitter values with animated values that
we can author. Particle Emitter Properties and the Update Loop
We're finally at the update loop! Because I'm not going to bother adding super-similar code, the update logic for each particle system is basically the same as the particle update job's code, just with particle emitters being checked and updated instead of particle systems. The Particle System class itself is just used to manage multiple emitters that constitute a single effect. Now, onto the particle emitter. Here's the list of features we're going to add right out of the gate. It might seem like a lot because we're just getting up and running, but in reality it's really just the basics, at least for what an artist might expect. Note where I've decided to use AnimatedValue to start, but depending on how creative you want to get, many more could use AnimatedValue.
Spawn area
Color over lifetime (AnimatedValue)
Color variance
Scale over lifetime (AnimatedValue)
Scale variance
Emitter-wide velocity over time (AnimatedValue)
Per-particle velocity variance
Gravity
Emitter-wide rotational velocity over time (AnimatedValue)
Per-particle rotation variance
Per-particle rotation rate variance
Emission per second (AnimatedValue)
Emitter lifetime
Particle lifetime
Particle lifetime variance
Blend mode
Facing type (either 3D or 2D billboard)
Depth softening
Material intensity over lifetime (AnimatedValue)
Material intensity variance
UV scrolling (AnimatedValue)
UV offsets
UV variance
Textures
Animated Textures
Maximum Particles
Minimum Particles
Looping
Toggle on/off

Let's get started!

void ParticleEmitter::Update(ParticleVertexBuffer *managedBuffer, float deltaTime, const Vector3 &cameraDirection, const Vector3 &cameraPosition)
{
	RandomGen *randGen = ParticleMemoryManager::GetSingleton()->GetMemoryPool(mPoolId)->GetRandomGen();
This is what we need to update our particles. We need the master vertex buffer (still to come), the delta time for this frame
(in seconds), the camera's position, and its direction. The first thing we do is also grab a random number generator for this emitter's memory pool.
Random generators aren't typically thread-safe, and because of how often they're used in this loop, it doesn't make much sense to create a lock/unlock
generator either, so although I didn't specify it earlier, I've added a "RandomGen" member to each memory pool so we can safely do thread-local random
number generation within them. You can use whatever generation you like, though I'd recommend strongly against the classic rand() because it's not the 90's
and we can all do much better. In my case I use std::mt19937 and a uniform distribution.
if (mEmitterLifeTime == 0)
{
	mEmitterCurrentLife = 0;
}
else if (mEmitterCurrentLife > mEmitterLifeTime)
{
	mShouldEmit = false;
}
else
{
	mEmitterCurrentLife += deltaTime;
}
Next, we check if the lifetime of the emitter is set to 0, which for us means we want it to play indefinitely (which is why we set the current life to 0).
Otherwise, we check if we've reached our emitter life limit. If so, then we tell the emitter to stop emitting, if not, we increment by the frame time.
if (mShouldEmit)
{
	float   emission = mEmissionPerSecond.GetValueByDelta(deltaTime) * deltaTime;
	float	partialEmission = MathHelper::GetFraction(emission);

	uint32 numParticlesToEmit = (uint32)emission;

	mPartialParticle += partialEmission;

	if (mPartialParticle > 1.0f)
	{
		numParticlesToEmit += 1;
		mPartialParticle -= 1.0f;
	}

	int numToMinimum = mMinActiveParticles - mParticles.CurrentSize();
	if (numToMinimum > 0)
	{
		numParticlesToEmit += numToMinimum;
	}
This is the beginning of the emission section. First we check if we should be emitting new particles with mShouldEmit. Then we tap into our
emission-per-second AnimatedValue to get how many particles we should emit. Over the life of an emitter, we may want to emit different amounts of
particles, which is why it's an AnimatedValue. Then we store the fraction of the emission and add it to the mPartialParticle member. We do this because
we may get an emitter that emits only a few particles per second, and if we only did whole-number emissions, we'd never emit a particle. So we add it to
mPartialParticle, and when we have a whole one, we add it to the emission for this frame. What comes after that is just a check to make sure it always has
at least mMinActiveParticles active. This number could be zero most of the time, but there's some cases when artists like being able to control it.
Click here for the emitter member variables and structures I use below.
for (uint32 i = 0; i < numParticlesToEmit; i++)
{
	if (mParticles.CurrentSize() >= mMaxParticles)
	{
		break;
	}

	Particle *newParticle = ParticleMemoryManager::GetSingleton()->GetMemoryPool(mPoolId)->GetNewParticle();

	if (newParticle == NULL)
	{
		break;
	}

	newParticle->Position = randGen->RandRange(mSpawnArea * -1.0f, mSpawnArea);
	newParticle->Rotation = randGen->RandRange(mRotationVariance * -1.0f, mRotationVariance);
	newParticle->RotationRate = randGen->RandRange(mRotationRateVariance * -1.0f, mRotationRateVariance);

	float scaleRand = randGen->RandRange(-mScaleVariance, mScaleVariance);
	newParticle->InitialScale = Vector3(scaleRand, scaleRand, 0);
	newParticle->Velocity = randGen->RandRange(mVelocityVariance * -1.0f, mVelocityVariance) + mVelocity.GetValueByDelta(deltaTime);
	newParticle->Acceleration = mGravity;
	newParticle->LifeTime = mParticleLifeTime + randGen->RandRange(mParticleLifeTimeVariance * -1.0f, mParticleLifeTimeVariance);
	newParticle->ColorMul = Color(1, 1, 1, 1);
	newParticle->ColorVar = randGen->RandRange(mColorVariance * -1.0f, mColorVariance);
	newParticle->CurrentLife = 0;
	newParticle->Scale = newParticle->InitialScale;
	newParticle->TexOffsets[0] = mUVScrollOffsets[0] + randGen->RandRange(mUVScrollVariance[0] * -1.0f, mUVScrollVariance[0]);
	newParticle->TexOffsets[1] = mUVScrollOffsets[1] + randGen->RandRange(mUVScrollVariance[1] * -1.0f, mUVScrollVariance[1]);
	newParticle->TexOffsets[2] = mUVScrollOffsets[2] + randGen->RandRange(mUVScrollVariance[2] * -1.0f, mUVScrollVariance[2]);
	newParticle->Intensity = randGen->RandRange(-mMaterialIntensityVariance, mMaterialIntensityVariance);

	newParticle->TextureFrame = Vector2::Zero();
	newParticle->TextureFrameTimeVar = randGen->RandRange(mTextureAnimation.FrameTimeVariance * -1.0f, mTextureAnimation.FrameTimeVariance);

	if (mTextureAnimation.IsAnimated && mTextureAnimation.RandomizeInitialFrame)
	{
		if (mTextureAnimation.FrameCountX > 0 && mTextureAnimation.FrameCountY > 0)
		{
			newParticle->TextureFrame = Vector2((float)randGen->RandRange(0, mTextureAnimation.FrameCountX - 1),
				(float)randGen->RandRange(0, mTextureAnimation.FrameCountY - 1));
		}
	}

	newParticle->TextureFrameTime = 0.0f;
	mParticles.Add(newParticle);
}
For each new particle, we check to make sure we haven't hit our maximum number of particles for the emitter. Then, we grab a new particle from the particle
pool, and NULL check it in case we've hit a memory pool limit. We accept that when memory pools are full, we gracefully fail, and emitters will not be able
to emit new particles until particles are freed. Most of what comes next is all mostly the same; we're just initializing the new particle based on all of
the initial and variance values that we want it to have. The idea is that we don't want all particles to, for example, have exactly the same lifespan, or
the exact same velocity, or even necessarily the same frame-rate if we're going through a flipbook texture. The solution is to add a randomized range of
variance to each through use of these variance members, which as a result creates much more interesting effects. So for velocity:newParticle->Velocity = randGen->RandRange(mVelocityVariance * -1.0f, mVelocityVariance) + mVelocity.GetValueByDelta(deltaTime);We get the emitter-wide velocity that we want to apply to all particles with mVelocity.GetValueByDelta. That's our initial velocity from the emitter. Then we take mVelocityVariance and find a random value based on that variance. So if the emitter had an upwards mVelocity of (0, 1, 0), and we wanted these particles to have random velocities to make them go in the X and Z direction as well, we'd make mVelocityVariance something like (0.5f, 0.0f, 0.5f). This would give us values between (-0.5, 1.0, -0.5) and (0.5, 1.0, 0.5) for the initial particle velocity, creating a nice variable emission.
At this point, we've added all the new particles we need for this frame. Now we'll update them:
mStartVert = managedBuffer->GetCurrentVertCount(mPoolId);

for (int i = 0; i < mParticles.CurrentSize(); i++)
{
	Particle *particle = mParticles[i];
	float life = particle->CurrentLife;

	if (life > particle->LifeTime)
	{
		ParticleMemoryManager::GetSingleton()->GetMemoryPool(mPoolId)->FreeParticle(particle);
		mParticles.Remove(i);
		i -= 1;
		continue;
	}

	float percentThroughLife = life / particle->LifeTime;
I start by getting the current vertex index in this pool's sub-vertex buffer. That won't really make sense until later, but just keep it in mind and I'll
come back to it in the section about the Master Vertex Buffer. Next I start the loop, and immediately get the life of the current particle, and check it
against its lifetime. If it has reached its lifetime, it returns to the memory pool, and we continue to the next particle. Otherwise, we calculate its
percentage through its life, which we'll use for a number of calculations below.Color colorMultiplier(mColorMultiplier.GetValueForTime(percentThroughLife)); Vector3 scalar = mScale.GetValueForTime(percentThroughLife); particle->Velocity = particle->Velocity + particle->Acceleration * deltaTime; particle->Position = particle->Position + particle->Velocity * deltaTime; particle->Rotation += (mRotationalVelocity.GetValueByDelta(deltaTime) + particle->RotationRate)* deltaTime; particle->Scale = scalar + particle->InitialScale; particle->ColorMul = colorMultiplier + particle->ColorVar; Vector2 uvScroll = mUVScroll[0].GetValueByDelta(deltaTime) * deltaTime; Vector2 uvScroll2 = mUVScroll[1].GetValueByDelta(deltaTime) * deltaTime; Vector2 uvScroll3 = mUVScroll[2].GetValueByDelta(deltaTime) * deltaTime; particle->TexOffsets[0] += uvScroll; particle->TexOffsets[1] += uvScroll2; particle->TexOffsets[2] += uvScroll3; particle->CurrentLife += deltaTime;We're assuming that for value-over-lifetime AnimatedValues like mColorMultiplier, that keyframe times are between 0.0 and 1.0, so that we can calculate the value based on the particle's 0.0-1.0 lifetime. You can validate that kind of input at tools-time, but for now we're assuming we've done that. I get the color-over-lifetime and scale-over-lifetime to start. Then, I add the delta acceleration to the velocity, and the delta velocity to the particle's position. For the rotation, I start with the emitter-wide rotational velocity over time, and add the per-particle rotation rate. This is what gives us the ability to rotate all particles at a given rate, or individual particles at variable rates, or both together. Next we set the scale based on the emitter-wide scale that we calculated earlier, plus the particle's individual initial scale. After that comes the color-over-lifetime that we calculated, plus the particle's individual color variance. Next comes the uv scrolling (texture scrolling), which are per-texture because we're going to support up to 3 textures, which will be covered in the rendering section. We add the scroll rate of each UV to its corresponding texture offset in the particle. Finally, we add the delta time to the particle's current life.
Next we're going to tackle particle facing, also known as bill-boarding. The big thing to remember is that particles are quads, but they need to be facing the camera all the same so that we can see them, and because we want them to look the same (or almost the same) no matter what angle the camera is facing.
Vector3 toCamera = Vector3(cameraDirection);
Vector3 particleRight = Vector3::Cross(toCamera, Vector3(0, 1.0f, 0)).Normalized() * -1.0f;
Vector3 particleUp;

if (mFacingType == ParticleFacing_2D_Billboard)
{
	particleUp = Vector3(0, 1.0f, 0);
}
if (mFacingType == ParticleFacing_3D_Billboard)
{
	particleUp = Vector3::Cross(toCamera, particleRight).Normalized();
}

Vector3 particleForward = Vector3::Cross(particleUp, particleRight);
D3DXMATRIX rotationMatrix;
D3DXMatrixIdentity(&rotationMatrix);
D3DXVECTOR3 forwardAsD3DX = particleForward.AsD3DVector3();
D3DXMatrixRotationAxis(&rotationMatrix, &forwardAsD3DX, particle->Rotation);
particleUp = Vector3::Transform(particleUp, rotationMatrix);
particleRight = Vector3::Transform(particleRight, rotationMatrix);

Vector3 particleRightAmount = particleRight * particle->Scale.X;
Vector3 particleUpAmount = particleUp * particle->Scale.Y;
To do this, we need to create a rotation matrix to rotate the particles correctly. We start by making a vector using our camera direction, which you can
think of as a forward vector. Since we know that a 'forward' vector crossed with an 'up' vector gives us the 'right' vector, we cross it with the global
'up' (0.0, 1.0, 0.0). We normalize it and multiply by -1.0, because we really want these vectors based on angles going to the camera, rather than away
from it. That's our temporary particleRight vector. Next we select our particle's 'up' vector based on how we want to billboard it. 2D billboarding is
great for effects that look awkward when rotated in 3D, or when you generally want a fixed vertical axis of rotation, like rain for example. For this,
it's easy! You just use the global up (0.0, 1.0, 0.0) vector, and you're good to go. If you want a 3D billboard, which we use for most effects, you cross
the camera vector (the 'forward') with the particleRight vector to get the new 'up' vector. Next, we cross our newly calculated particleUp and
particleRight vectors to get the actual particleForward vector, which we need in order to rotate the particle around its camera-facing axis. You'll notice
this is why particle rotation is a single floating point value, because their billboarded nature makes it such that you only ever need to rotate around a
single axis. D3D already has a function for this, so I do a quick conversion to their vector type, and create a rotation matrix with the particle's
rotation around its forward axis. Then, all we need to do is transform the particleUp and particleRight vectors by that rotation matrix, and we have our
final up and right vectors, which we'll need to build our particle vertices. Lastly, we find the amount we're going to scale the particle along its axes
based on the particle's scale. We'll be using these values in a little bit. At this point, we have the particle position, color, and vertex offsets. The last thing we need to construct the verts that we send to the graphics card is the texture coordinates. We already calculated our texture coordinate offsets above, so here I just make them into convenient D3D vectors for what I do in a bit. My vertex struct is made of D3D vectors for now, which is why you'll see me play back and forth between my own types and D3D. The reasoning for making the latter two be D3DXVECTOR3 is to make the addition simpler down the line.
D3DXVECTOR2 texCoordOffset(particle->TexOffsets[0].X, particle->TexOffsets[0].Y);
D3DXVECTOR3 texCoordOffset2(particle->TexOffsets[1].X, particle->TexOffsets[1].Y, 0.0f);
D3DXVECTOR3 texCoordOffset3(particle->TexOffsets[2].X, particle->TexOffsets[2].Y, 0.0f);
Now it's time to handle sprite-sheet animation, should an artist choose to use it. We start by setting up the two coordinates we'll need: the bottom right and top left texture coordinates. If we want animation, we continue into this statement, and then check that our frame-rate is greater than 0, otherwise we can skip the frame update logic. If it is, we add the delta time to texture frame time of the particle. If that frame time becomes larger than the framerate of the animation plus any variance we've given to the framerate when we created the particle, then that means it's time to move onto the next frame of animation. In that case, we reset the frame time, and move to the next frame in this row of the sprite sheet (TextureFrame.X). If that becomes more than the number of frames in this row, we set the X frame back to the beginning, and increment to the next row of animation (TextureFrame.Y). If that also becomes more than the number of rows we have, then we fully reset to the first frame (0,0) of the animation. This logic is what drives our frame to frame animation.
Vector2 texBottomLeft[3];
Vector2 texTopRight[3];

if (mTextureAnimation.IsAnimated)
{
	if (mTextureAnimation.FramesPerSecond > 0)
	{
		particle->TextureFrameTime += deltaTime;

		if (particle->TextureFrameTime > ((1.0f / mTextureAnimation.FramesPerSecond) + particle->TextureFrameTimeVar))
		{
			particle->TextureFrameTime = 0.0f;
			particle->TextureFrame.X += 1;

			if (particle->TextureFrame.X > (mTextureAnimation.FrameCountX - 1))
			{
				particle->TextureFrame.X = 0;
				particle->TextureFrame.Y += 1;

				if (particle->TextureFrame.Y > (mTextureAnimation.FrameCountY - 1))
				{
					particle->TextureFrame.Y = 0;
				}
			}
		}
	}
Next is the logic we need to convert from animation frames to texture coordinates. All we have to do is calculate the percentage across the row and
column of each side of the animation frame by using the frame counts. Next we apply these texture coordinates to the textures that require the animation.
IsAnimatedForTextureIndex serves to allow certain textures to animate in cases where we may only want one or two to do so. That's it for animation!
	float xFrame = particle->TextureFrame.X;
	float yFrame = particle->TextureFrame.Y;

	float xPos = xFrame / (float)mTextureAnimation.FrameCountX;
	float x1Pos = (xFrame + 1.0f) / (float)mTextureAnimation.FrameCountX;
	float yPos = yFrame / (float)mTextureAnimation.FrameCountY;
	float y1Pos = (yFrame + 1.0f) / (float)mTextureAnimation.FrameCountY;

	texBottomLeft[0] = mTextureAnimation.IsAnimatedForTextureIndex[0] ? Vector2(xPos, y1Pos) : Vector2(0.0f, 1.0f);
	texBottomLeft[1] = mTextureAnimation.IsAnimatedForTextureIndex[1] ? Vector2(xPos, y1Pos) : Vector2(0.0f, 1.0f);
	texBottomLeft[2] = mTextureAnimation.IsAnimatedForTextureIndex[2] ? Vector2(xPos, y1Pos) : Vector2(0.0f, 1.0f);

	texTopRight[0] = mTextureAnimation.IsAnimatedForTextureIndex[0] ? Vector2(x1Pos, yPos) : Vector2(1.0f, 0.0f);
	texTopRight[1] = mTextureAnimation.IsAnimatedForTextureIndex[1] ? Vector2(x1Pos, yPos) : Vector2(1.0f, 0.0f);
	texTopRight[2] = mTextureAnimation.IsAnimatedForTextureIndex[2] ? Vector2(x1Pos, yPos) : Vector2(1.0f, 0.0f);
}

And of course, if mTextureAnimation.IsAnimated was turned off, we still need to set the texture coordinates to the standard locations.

else
{
	texBottomLeft[0] = Vector2(0.0f, 1.0f);
	texBottomLeft[1] = Vector2(0.0f, 1.0f);
	texBottomLeft[2] = Vector2(0.0f, 1.0f);

	texTopRight[0] = Vector2(1.0f, 0.0f);
	texTopRight[1] = Vector2(1.0f, 0.0f);
	texTopRight[2] = Vector2(1.0f, 0.0f);
}

Sprite sheet animations can be cool, but it's easy to see the repetition.
We're so close! Before finally building our vertices, we just need to calculate one more variable, the particle's material intensity. This is definitely something we want on a per-particle basis so we can get variable glowing, so we calculate it right before setting up our vertices so it can be part of the vertex data. Like a number of other parameters, we calculate the emitter-wide intensity plus the per-particle intensity. We also get our vertex color in the output format we'll need.
float intensity = particle->Intensity + mMaterialIntensity.GetValueForTime(percentThroughLife);
D3DXVECTOR4 colorAsD3D = particle->ColorMul.AsD3DVector4();
Now we're ready! We start by creating our four vertex variables in our vertex format:
MeshDataD3D bottomLeftVert;
MeshDataD3D topLeftVert;
MeshDataD3D bottomRightVert;
MeshDataD3D topRightVert;
You'll want to plug in whatever structure you use for these. My vertex structure inside of MeshDataD3D is Position, Normal, TexCoord, Tangent, Binormal, and Color.
bottomLeftVert.Position = (particle->Position - particleRightAmount - particleUpAmount).AsD3DVector3();
bottomLeftVert.TexCoord = D3DXVECTOR2(texBottomLeft[0].X, texBottomLeft[0].Y) + texCoordOffset;
bottomLeftVert.Tangent  = D3DXVECTOR3(texBottomLeft[1].X, texBottomLeft[1].Y, intensity) + texCoordOffset2;
bottomLeftVert.Binormal = D3DXVECTOR3(texBottomLeft[2].X, texBottomLeft[2].Y, 0.0f) + texCoordOffset3;
bottomLeftVert.Color = colorAsD3D;

topLeftVert.Position = (particle->Position - particleRightAmount + particleUpAmount).AsD3DVector3();
topLeftVert.TexCoord = D3DXVECTOR2(texBottomLeft[0].X, texTopRight[0].Y) + texCoordOffset;
topLeftVert.Tangent  = D3DXVECTOR3(texBottomLeft[1].X, texTopRight[1].Y, intensity) + texCoordOffset2;
topLeftVert.Binormal = D3DXVECTOR3(texBottomLeft[2].X, texTopRight[2].Y, 0.0f) + texCoordOffset3;
topLeftVert.Color = colorAsD3D;

bottomRightVert.Position = (particle->Position + particleRightAmount - particleUpAmount).AsD3DVector3();
bottomRightVert.TexCoord = D3DXVECTOR2(texTopRight[0].X, texBottomLeft[0].Y) + texCoordOffset;
bottomRightVert.Tangent  = D3DXVECTOR3(texTopRight[1].X, texBottomLeft[1].Y, intensity) + texCoordOffset2;
bottomRightVert.Binormal = D3DXVECTOR3(texTopRight[2].X, texBottomLeft[2].Y, 0.0f) + texCoordOffset3;
bottomRightVert.Color = colorAsD3D;

topRightVert.Position = (particle->Position + particleRightAmount + particleUpAmount).AsD3DVector3();
topRightVert.TexCoord = D3DXVECTOR2(texTopRight[0].X, texTopRight[0].Y) + texCoordOffset;
topRightVert.Tangent = D3DXVECTOR3(texTopRight[1].X, texTopRight[1].Y, intensity) + texCoordOffset2;
topRightVert.Binormal = D3DXVECTOR3(texTopRight[2].X, texTopRight[2].Y, 0.0f) + texCoordOffset3;
topRightVert.Color = colorAsD3D;
All we're doing here is finding our four vertex corners by offsetting the particle's position by the offsets we just calculated, as well as the three sets of possible texture coordinates. You'll notice I'm just hijacking my vertex input's tangent and binormal inputs to store the second and third set of texture coordinates, and the material intensity. We also set the vertex color that we calculated earlier.
Now all we have to do is add the two triangles that make up the quad to the master vertex buffer.
managedBuffer->AddParticleVert(bottomLeftVert, mPoolId);
managedBuffer->AddParticleVert(topLeftVert, mPoolId);
managedBuffer->AddParticleVert(bottomRightVert, mPoolId);
managedBuffer->AddParticleVert(bottomRightVert, mPoolId);
managedBuffer->AddParticleVert(topLeftVert, mPoolId);
managedBuffer->AddParticleVert(topRightVert, mPoolId);
And before ending the update function, we store off the emitter's distance from the camera, and the final vert location in the master vertex buffer, for use later when we render.
mEndVert = managedBuffer->GetCurrentVertCount(mPoolId);
mDistanceFromCamera = Vector3::GetDistance(mPosition, cameraPosition);
Optimizing the Update Loop
I'm going to briefly cover some really important things to keep in mind in order to achieve the fastest particle systems you can make.Extract Unnecessary Recalculation
You'll notice, we could extract the initial calculations for the particle up, right, and forward vectors and update them outside of this for-loop because they're the same for all particles. Same goes for the AnimatedValue members that we call with GetValueByDelta, because they're not dependent on any information from the particles themselves. I've done this in my completed code, but for the sake of this write-up, it was easier to explain it the way I did above. You absolutely should optimize this as well.Make Good Decisions about Pool/Job Count
You'll notice my default pool count was eight, and that's because I have a quad-core machine. For each CPU core, there are (depending on your processor) two logical cores that you can do processing on. I use a thread pool of eight worker threads for this exact reason, and so when I run my update loop jobs, I end up with a nice even spread of the update logic processing across all my CPU cores. This can mean the difference between multiple milliseconds of your frame time when you're dealing with thousands of particles, so be sure to keep it in mind and make good decisions.Level Up Big-Time with SIMD
Because SIMD is an entire subject onto its own, I'm not going to go in depth about it here, but check the references section for a good resource on learning about it. In brief, SIMD allows us to perform operations simultaneously on several values stuffed into 128-bit registers. That's enough room for us to build all four particle vertices at once. After doing that myself, I found that constructing the vertices took less than half the CPU time when using SIMD. That's some serious performance gain. Next, I took it one step further and reworked my update loop so that I could process four particles at once, and doing so cut the entire update process time to less than half of what it was. I had no idea going in that SIMD would make such a big difference, but I've found it is absolutely necessary in order to have a high-performance CPU particle system. You can't turn your back on literally doubling the speed of your particle system, so it's worth taking the time to do it in yours as well. Here's what the update loop above looks like after I made the switch to SIMD. Most of the SIMD work was just converting the arrays of structures to structures of arrays, and then pulling the values back out when I was done by using the SSE_128 union structure I created. I also spent a decent amount of time pulling my hair out trying to debug it, until I remembered that _mm_set actually loads the values into memory in reverse of how you input them. Don't make the same mistake I did!Rendering
Now that we've got our particles updating and our geometry building, we can get started on the particle rendering pipeline. We'll cover vertex buffer setup (finally), sorting, blending, and shading.The Master Particle Vertex Buffer
I've referenced it a number of times, and it's finally time to talk about it. Over the course of the update loop, you saw that I would add vertices to this object and keep track of the beginning and end vertices on a per-emitter basis. Here's why.The master particle vertex buffer is exactly that, a single vertex buffer large enough to store all of our possible particle vertices. We accumulate the vertex data over the course of the update loop, merge it all into the singular buffer, and map that data for the GPU. Mapping in general can be a bad for performance, so reducing the amount we do it to only once per frame, while encompassing all particles, is good. The downside is that we're wasting memory space when we're in scenes with low particle usage, so it's important to keep our memory pools as low as we can while still allowing for the number of particles we need.
Like our memory pools, we'll need to create a number of vertex pools and variables based on the number of memory pools we have, so that we can safely add the vertices during the multithreaded update loop.
DynamicArray < MeshDataD3D * > mParticleVerts;
DynamicArray < uint32 > mCurrentVerts;
DynamicArray < uint32 > mVertOffsetsForPools;
ID3D11Buffer *mVertexBuffer;
ID3D11Buffer *mIndexBuffer;
This is all we need for the master vertex buffer. We have an array of vertex arrays (one for each pool), an array each for vertex counters and vertex offsets for pools so that emitters can correctly index into the master vertex buffer when rendering, and of course the vertex and index buffers. We saw earlier that the ParticleManager calls the initialization of the particle vertex buffer, so let's start there:
void ParticleVertexBuffer::Initialize(ID3D11Device *device, uint32 maxNumParticles, uint32 numPools)
{
	uint32 numVertsPerPool = (maxNumParticles / numPools) * 6;
	uint32 numVerts = maxNumParticles * 6;

	for (uint32 i = 0; i < numPools; i++)
	{
		mParticleVerts.Add(new MeshDataD3D[numVertsPerPool]);
		mCurrentVerts.Add(0);
		memset(mParticleVerts[i], 0, sizeof(MeshDataD3D) * numVertsPerPool);
	}

	MeshDataD3D *initData = new MeshDataD3D[numVerts];

	unsigned long* indices = new unsigned long[numVerts];
	D3D11_BUFFER_DESC vertexBufferDesc;
	D3D11_BUFFER_DESC indexBufferDesc;
	D3D11_SUBRESOURCE_DATA vertexData;
	D3D11_SUBRESOURCE_DATA indexData;
	HRESULT result;

	for (uint32 i = 0; i < numVerts; i++)
	{
		indices[i] = i;
	}

	vertexBufferDesc.Usage = D3D11_USAGE_DYNAMIC;
	vertexBufferDesc.ByteWidth = sizeof(MeshDataD3D) * numVerts;
	vertexBufferDesc.BindFlags = D3D11_BIND_VERTEX_BUFFER;
	vertexBufferDesc.CPUAccessFlags = D3D11_CPU_ACCESS_WRITE;
	vertexBufferDesc.MiscFlags = 0;
	vertexBufferDesc.StructureByteStride = 0;
	vertexData.pSysMem = initData;
	vertexData.SysMemPitch = 0;
	vertexData.SysMemSlicePitch = 0;

	result = device->CreateBuffer(&vertexBufferDesc, &vertexData, &mVertexBuffer);
	if (FAILED(result))
	{
		//handle it
	}

	indexBufferDesc.Usage = D3D11_USAGE_DEFAULT;
	indexBufferDesc.ByteWidth = sizeof(unsigned long) * numVerts;
	indexBufferDesc.BindFlags = D3D11_BIND_INDEX_BUFFER;
	indexBufferDesc.CPUAccessFlags = 0;
	indexBufferDesc.MiscFlags = 0;
	indexBufferDesc.StructureByteStride = 0;
	indexData.pSysMem = indices;
	indexData.SysMemPitch = 0;
	indexData.SysMemSlicePitch = 0;
	result = device->CreateBuffer(&indexBufferDesc, &indexData, &mIndexBuffer);
	if (FAILED(result))
	{
		//handle it
	}

	delete[] indices;
	delete[] initData;
}
This is pretty simple stuff which you've probably already done in your own engine, but we'll scan through it quickly. We start by finding the number of
particle vertices we have per pool, and the total number of vertices. For each pool, we create an array of particle vertices, and add a vertex counter
that starts at 0. Then we create a full vertex array to just use as initialization data (initData), initialize the vertex and index buffers, and clean
up the memory we don't need anymore.
At the beginning of the ParticleManager update, you saw that I would start by calling ClearParticleVerts() on the buffer. All that's needed here is to set the current vertex counter for each pool to 0.
void ParticleVertexBuffer::ClearParticleVerts()
{
	for (uint32 i = 0; i < mCurrentVerts.CurrentSize(); i++)
	{
		mCurrentVerts[i] = 0;
	}
}

Over the course of the emitter update loop, we add the vertex with AddParticleVert:

void ParticleVertexBuffer::AddParticleVert(const MeshDataD3D &vert, uint32 poolId)
{
	uint32 currentVert = mCurrentVerts[poolId];
	mParticleVerts[poolId][currentVert] = vert;
	mCurrentVerts[poolId]++;
}
All we have to do is find the current vertex index for this memory pool, and apply the new vert data to that pool's vertex buffer. Then we increment the
vertex counter for next time. Emitters also call GetCurrentVertCount like you saw in the update loop, which they do before and after they've added
vertices so they can index into this buffer later. All GetCurrentVertCount does is return mCurrentVerts[poolId] based on the pool ID provided by the
emitter.
Finally, as we'll see in the ParticleManager's render function in a bit, we need to call a function to accumulate all this vertex data and map it into the vertex buffer.
void ParticleVertexBuffer::ApplyVertsAndSetBuffers(ID3D11DeviceContext* deviceContext)
{
	D3D11_MAPPED_SUBRESOURCE mappedResource;
	HRESULT result = deviceContext->Map(mVertexBuffer, 0, D3D11_MAP_WRITE_DISCARD, 0, &mappedResource);
	if (FAILED(result))
	{
		return;
	}

	MeshDataD3D *vertData = (MeshDataD3D*)mappedResource.pData;

	mVertOffsetsForPools.ClearFast();
	uint32 resourceIndex = 0;
	uint32 numParticleVertArrays = mParticleVerts.CurrentSize();
	for (uint32 i = 0; i < numParticleVertArrays; i++)
	{
		mVertOffsetsForPools.Add(resourceIndex);
		memcpy(vertData + resourceIndex, (void*)mParticleVerts[i], sizeof(MeshDataD3D) * mCurrentVerts[i]);
		resourceIndex += mCurrentVerts[i];
	}

	deviceContext->Unmap(mVertexBuffer, 0);

	uint32 stride = sizeof(MeshDataD3D);
	uint32 offset = 0;
	deviceContext->IASetVertexBuffers(0, 1, &mVertexBuffer, &stride, &offset);
	deviceContext->IASetIndexBuffer(mIndexBuffer, DXGI_FORMAT_R32_UINT, 0);
}
The purpose of keeping track of our current vertices and offsets should be clearer now. The only way emitters will know where to index is if we keep
track of our offsets and counts as we copy data into the buffer. For each array of particle vertices we have, we add the current pool vertex offset for
the emitters to reference later. Then, we mem-copy the data in the current vertex array into the vertex buffer. Finally, we add the number of vertices in
this array to the resource index we use to keep track of offsets. Once we've done that for each array, we finish the mapping, and set the vertex and index
buffers to prepare ourselves for rendering with them.
void ParticleManager::Render(ID3D11DeviceContext *deviceContext, ShaderParams &inputParams)
{
	mMasterVertexBuffer->ApplyVertsAndSetBuffers(deviceContext);
As you can see, the first thing we do when we go to render is call this function we just covered. Next in this function comes sorting!
Sorting
Sorting our particle systems is essential to rendering them properly in a scene so that you don't have particles rendering incorrectly. There are a few ways people tend to go about sorting. I find that a lot of people say things like "all particles must be sorted in order to ensure proper blending", and then run sorting algorithms over all their emitters to keep particles sorted. This is mostly true, but sorting all of your particles is an incredibly costly operation, and I don't believe it's worth the performance trade-off in order to be able to write particles into the depth buffer.The alternative, which ensures proper blending for almost all cases, is to turn off depth writing and do your sorting on a per-emitter basis based on their distance from the camera. The downside is that if you have two emitters very close to each other, one will render all their particles over the other one, rather than mixing properly. This isn't a problem for most use cases, and the remaining cases are either visually acceptable or can be addressed by authoring particle emitters a bit differently so that collisions aren't an eye-sore. The upside is that your performance will be much better from not running sorting algorithms over all your particles. This is just the conclusion that I've come to; you may find it to be a good exercise to sort your particles and judge the performance difference for yourself.
	mSortedEmitters.ClearFast();

	for (uint32 p = 0; p < DEFAULT_NUM_MEMORY_POOLS; p++)
	{
		for (uint32 i = 0; i < mParticleSystems[p].CurrentSize(); i++)
		{
			DynamicArray *emitters = mParticleSystems[p][i]->GetParticleEmitters();

			for (uint32 e = 0; e < emitters->CurrentSize(); e++)
			{
				mSortedEmitters.Add((*emitters)[e]);
			}
		}
	}

	if (mSortedEmitters.CurrentSize() > 1)
	{
		SortEmitters(0, mSortedEmitters.CurrentSize() - 1);
	}
Right now, I just clear out a dynamic array and fill it with all the currently active particle emitters. Eventually, when I add emitter culling and other
exclusion factors, I'll handle that here and just exclude those emitters from this array. Then I run a sorting function over the array (it's just a
standard quick-sort) using the particle emitters' mDistanceFromCamera that we calculate during the update loop, and the emitters are ready for rendering!
Blending
Before we start shading each emitter, we need to set the correct blend mode. Unfortunately, because we need to sort by emitter depth, we can't sort our rendering by blend mode, which would have reduced the overhead of state switching. Thankfully, there are only two blend modes that are used for a majority of particle systems in general: alpha blending and additive blending. I'm also going to cover multiply, 2x multiply, and subtract blend modes, but you're not likely to need them much. Here is the code needed to create these different states:CD3D11_BLEND_DESC desc(D3D11_DEFAULT); desc.RenderTarget[0].BlendEnable = true; desc.RenderTarget[0].SrcBlend = D3D11_BLEND_SRC_ALPHA; desc.RenderTarget[0].DestBlend = D3D11_BLEND_INV_SRC_ALPHA; desc.RenderTarget[0].BlendOp = D3D11_BLEND_OP_ADD; desc.RenderTarget[0].SrcBlendAlpha = D3D11_BLEND_ZERO; desc.RenderTarget[0].DestBlendAlpha = D3D11_BLEND_ZERO; desc.RenderTarget[0].BlendOpAlpha = D3D11_BLEND_OP_ADD; mGraphicsManager->GetDevice()->CreateBlendState(&desc, &mAlphaBlendState); desc.RenderTarget[0].SrcBlend = D3D11_BLEND_ONE; desc.RenderTarget[0].DestBlend = D3D11_BLEND_ONE; mGraphicsManager->GetDevice()->CreateBlendState(&desc, &mAdditiveBlendState); desc.RenderTarget[0].SrcBlend = D3D11_BLEND_ZERO; desc.RenderTarget[0].DestBlend = D3D11_BLEND_SRC_COLOR; mGraphicsManager->GetDevice()->CreateBlendState(&desc, &mMultiplyBlendState); desc.RenderTarget[0].SrcBlend = D3D11_BLEND_DEST_COLOR; desc.RenderTarget[0].DestBlend = D3D11_BLEND_SRC_COLOR; mGraphicsManager->GetDevice()->CreateBlendState(&desc, &mMultiply2xBlendState); desc.RenderTarget[0].SrcBlend = D3D11_BLEND_SRC_ALPHA; desc.RenderTarget[0].DestBlend = D3D11_BLEND_ONE; desc.RenderTarget[0].BlendOp = D3D11_BLEND_OP_REV_SUBTRACT; mGraphicsManager->GetDevice()->CreateBlendState(&desc, &mSubtractBlendState);Alpha blending uses the source (the particle rendering result) alpha channel to control the blending between the particle and the render target (scene) color.
Additive blending adds the particle color to the render target color. This is less performance-heavy than alpha blending, but obviously produces a different result.
Subtract blending subtracts the particle's resulting color from the render target.
Multiply blending multiplies the render target color by the resulting particle color. Multply 2x does the same thing, but adds the inverse (source x destination color) as well. I don't have good particle textures to use for this kind of blending, but see this link so you can understand how it looks.
	for (uint32 i = 0; i < mSortedEmitters.CurrentSize(); i++)
	{
		deviceContext->OMSetBlendState(GetBlendStateForMode(mSortedEmitters[i]->GetBlendMode()), 0, 0xFFFFFFFF);
		mSortedEmitters[i]->SetShaderParameters(deviceContext, inputParams);
		mSortedEmitters[i]->Render(deviceContext, mMasterVertexBuffer);
	}
So now for each emitter, we just get the emitter's blend mode value and assign the appropriate blend mode state (GetBlendStateForMode is just a switch
statement over the states we just created), and render the emitter. That's it for the ParticleManager, let's go into the ParticleEmitter render function.
Particle Emitter Rendering
void ParticleEmitter::Render(ID3D11DeviceContext *deviceContext, ParticleVertexBuffer *managedBuffer)
{
	uint32 numberOfVerts = mEndVert - mStartVert;
	if (numberOfVerts == 0)
	{
		return;
	}

	mMaterial->Render(deviceContext);
	deviceContext->IASetPrimitiveTopology(D3D11_PRIMITIVE_TOPOLOGY_TRIANGLELIST);
	deviceContext->DrawIndexed(numberOfVerts, managedBuffer->GetVertOffsetForPool(mPoolId) + mStartVert, 0);
}
Our prior setup makes this step very simple. We just index into the vertex buffer based on this emitter's pool's offset and the offset within the pool
itself, and render the appropriate number of vertices. The mMaterial->Render bit will be up to you to fill in because a material-to-shader rendering
pipeline is its own topic. If you're already rendering things in your engine, you should already have everything you need. All that mMaterial is doing
is setting up the shader and constant buffers. You'll see what information we need in the next section - the shader!
Shading
In this section, I'm assuming you have an understanding of how Uber Shaders work, because this is how I create particle shader permutations. If you don't, I happen to have a really quick write-up about how they work!Our particle shader will be pretty simple, but it's capable of some great looking effects. We're going to support up to three textures being combined together – two diffuse textures and an alpha texture. The combination of all three, with the ability to do separate UV scrolling for each that we coded in the update loop, can create some very dynamic visuals. We're also going to support depth-softening, which will remove hard edges where the particle geometry meets the scene geometry.
Vertex Shader
Have a look at the vertex shader here. This is pretty simple stuff. You'll see that I've commented where we hijacked the tangent and binormals earlier in order to store two extra sets of texture coordinates and the particle material intensity. We just pass that data straight through to the pixel shader. Outside of that, it's just the standard calculating of the model-view-projection position, and storing of that position as well as the view-space position so we can do depth-softening in the pixel shader. We also pass through the vertex coloring to the pixel shader; doing it this way is what has allowed us to have different per-particle colors.Pixel Shader
Now have a look at the pixel shader here. We have one texture no matter what, with optional enabling of DiffuseTexture2 and AlphaTexture depending on which combination of textures we want. We can also optionally enable depth softening, in which case we need to pass in the depth buffer from the deferred rendering scene pass.You'll see that, if we want depth softening, we also need to fill an extra constant buffer with data. We need the camera projection matrix for depth softening in order to reconstruct the depth of the depth buffer that we're going to sample. We also pass in depthFadeDistance and depthFadePower, which allow us to control how harsh or soft we want the depth softening, and over what special distance it should fade. Now let's go through this one step by step.
float4 outputColor = pow(DiffuseTexture.Sample(DiffuseSampler, input.texCoord0.xy), 2.2) * input.color;We sample the diffuse texture using the first set of texture coordinates. The pow([…], 2.2) is to do the SRGB conversion because I account for that in my engine. If you don't, feel free to leave that out, but eventually being SRGB correct is something you'll likely want to do. We then multiply this result by the vertex color that we passed through, in order to incorporate that color.
outputColor *= pow(DiffuseTexture2.Sample(DiffuseSampler, input.texCoord0.zw), 2.2);If we have a second texture enabled, we multiply the output color by the second texture's color. Note that I'm using the second set of texture coordinates (texCoord0.zw) for this texture. Combining multiple textures together will obviously darken the color, and that's why we've allowed for per-particle intensity, so that we can turn up the brightness again appropriately. You'll see that a bit lower down.
outputColor.a *= AlphaTexture.Sample(DiffuseSampler, input.texCoord1.xy).r;If we have an alpha map, we can sample whatever channel to get the value, and we multiply it into the output color's alpha channel. Again, note that I'm using the third and final set of texture coordinates here (texCoord1.xy) for the alpha texture.
float2 screenPos = input.mvpPosition.xy / input.mvpPosition.w;
screenPos = 0.5f * float2(screenPos.x, -screenPos.y) + 0.5;

float depthViewPos = ComputeViewspaceDepth(DepthTexture.Sample(DepthSampler, screenPos).r);

float viewDistance = abs(input.viewPosition.z - depthViewPos);

outputColor.a *= pow(saturate(viewDistance / depthFadeDistance), depthFadePower);
For depth softening, we convert the view-projection position into a screen-space position (corrected for DirectX screen space). We then use that position to sample the depth buffer, and pass that to the function that will convert the depth buffer value into view space depth. I use a view-space depth buffer, you will need to do this differently if you use standard view-projection depth. Next, find the view-space distance between the particle itself and the scene's depth position for that pixel. That distance gets divided by our depthFadeDistance in order to fade that over the distance we want, and we saturate it so that anything outside of that distance won't have any fade. Then we control how harsh we want that falloff to be by pow'ing it with our depthFadePower. This will give us that nice fade to clean up those harsh edges where the particles meet the scene geometry.
outputColor.rgb *= input.texCoord1.z * outputColor.a; // material intensityAlmost done! Here we multiply by the particle intensity that we passed in per-vertex (input.texCoord1.z) in order to boost the brightness, or lower it depending on what you want to do. We then multiply the color output by its alpha channel in order for our blending to work as intended. For example, for additive alpha where we add this result to the frame buffer, we only want to add as much color as our alpha channel for this particle, otherwise it would be solid.
And that's it! We've made it from the beginning to the end of the particle pipeline!
Performance
Where appropriate, I talked about optimizations and performance considerations in previous sections, but I wanted to address some things here as well.Use-Case Statistics
My use case that I used to test for performance was with 24,000 particles spread across 200 particle emitters, averaging 120 particles each. The emitters made use of every single AnimatedValue possible, which means this would be a worst-case scenario for update loop performance because we save time for every AnimatedValue that we don't have to use.12 Memory Pools, SIMD update: ~3.05ms 8 Memory Pools, SIMD update: ~2.25ms 4 Memory Pools, SIMD update: ~3.19ms 1 Memory Pool, SIMD update: ~6.42ms 12 Memory Pools, No SIMD: ~6.89ms 8 Memory Pools, No SIMD: ~5.26ms 4 Memory Pools, No SIMD: ~7.24ms 1 Memory Pool, No SIMD: ~14.03msThese statistics should hammer home the things I've discussed over the course of this walkthrough. The difference between multithreading (multiple pools) and not multithreading (1 memory pool), is so large that you almost shouldn't bother making a CPU particle system unless you multithread it. Then, when you do multithread, it's important to select the correct number of pools and update jobs. As you can see on my quad-core CPU (8 logical threads), 8 memory pools is the magic number to get the most out of the multithreading. Finally, converting the update-loop to process 4 particles at once using SIMD more than doubles the speed. Those are some performance savings that you just can't ignore. Overall, in a relatively particle-heavy scene with 24,000 particles in 200 emitters updating at once, 2.25ms (13% of a 60FPS frame) is very efficient.
Screen Fill vs. Particle Count
Of course, none of those savings matter if you don't keep track of your screen fill! It may not be obvious until you see it for yourself, but the amount of screen-space the particles fill matters a hell of a lot more than the number of particles you have. Blending is not cheap, and it can have a significant impact on your frame rate. An easy way to test this is to create a single particle system with, say, 50 particles. Stand relatively far away from the particle system, and turn on FRAPS to see what your FPS is. Then, walk your camera towards the particle system until it fills (or mostly fills) your screen, and watch your frame rate tank. Always be mindful of this and consider the way particle systems are used accordingly.Why Not Use GPU Particles?
GPU particles are great! But it may surprise you to know that GPU particles are not always the answer.A fair amount of overhead is needed in order to issue those commands to update particles on the GPU, which means you're only getting your money's worth out of GPU particles when you have hundreds or thousands particles in your emitters. That's what GPU particles are well suited for. When you have a large number of varying particle systems with under a hundred particles for example, CPU particle systems may be the way to go because they'll be less wasteful.
You must also consider whether your application is CPU or GPU bound. In this day and age, PC CPUs are pretty damned fast, and you may find that at the end of your PBR lighting pass and twenty-step post-processing stack that you don't have much GPU time left over to keep your 60 FPS. In that case, it might be silly to offload your particle update logic to the GPU because you would either be harming your frame rate or you'd be taking that time back by reducing your shading quality. On the flip-side if you're developing for something like an Xbox One or PS4, which have relatively weak CPUs, you're very likely to be CPU bound. In that case, offloading any particle logic you can to the GPU will be a victory.
Really, it's all about balance. The ideal particle system architecture has the ability to handle both CPU and GPU particles, and is smart enough to assign the correct particle systems to the appropriate processors. Maybe it's even smart enough to detect whether it could increase frame rate by reassigning particles to the other processor.
Memory
I talked a lot about this before, but the way I've built this is pretty friendly memory-wise. An added advantage to building the memory management on pre-allocated pools is that we know exactly how much memory we're going to spend on particles before even compiling the engine, and can increase/decrease these numbers easily based on the platform, different scene demands, etc. We also do virtually no memory allocation after the initial scene construction, which is handled at load time. That's great for achieving high performance.Beyond the Engine
These are some extraneous topics to the main particle system engine implementation, but I still think they're important to cover.Templating
A big issue that many artists have as they create more and more particle systems is being able to template systems so they don't have to keep re-creating them. When you get file loading/saving of particle systems working, consider adding the ability to create files which reference another particle system file, but with several properties overridden. In an incredibly basic example://ParticleSystem.txt Color[1.0, 1.0, 1.0, 1.0] Velocity[0.0, 10.0, 0.1] Gravity[0.0, 9.8, 0.0] And now you want a similar system with all the same properties, but the color blue instead: //BlueParticleSystem.txt Template[ParticleSystem.txt] Color[0.0, 0.0, 1.0, 1.0]Obviously, this is more useful when you have lots of properties exposed, because the benefit is being able to quickly make similar particle systems without doing a lot of work.
Another thing I highly recommend is to allow the ability to template your AnimatedValue class, or whatever kind of animation curve system you have. Artists hate to have to recreate animation curves that they've done before, and many editors I've seen do not allow for it. It means that you'll need to add the ability to load and save AnimatedValues as files, but it's so worth it to be able to reuse the same curves in different places without needing to recreate them.
Creating a Worthy Editor
If or when you get to the point when you want to create an editor for these new awesome particle systems, please do yourself a service and create a front-end worthy of your work. A value editor sheet in Windows Forms like this is not going to cut it:
Artists do not think the same way we do. We might think a down-to-the-dirt solution like this is good enough for us because we're very data-minded, but they are visual people. I'm not claiming it to be the perfect front-end solution, but a node-based component graph editor like the image below is a much better solution for the way artists think. Rather than an unwieldy slew of fields to edit, they get to pick and choose which components to add, which is much easier to manage. Let them construct the flow of how they see their particle systems working, and just compile that into a data structure behind the scenes for them, they'll thank you for it!
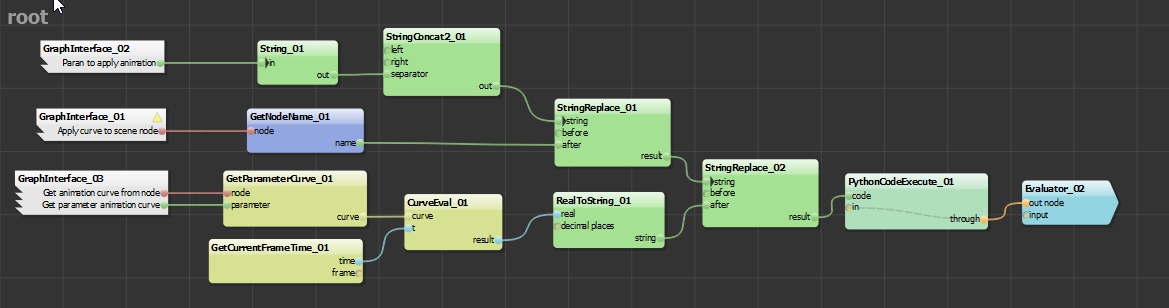
The End Result
Here's a video of just a few examples I came up with. An FX artist's imagination could do much better than mine, but it should give you an idea of how diverse your particle systems can become as you add support for more features.References & Resources
A good quick overview of blending can be found here: https://msdn.microsoft.com/en-us/library/bb976070.aspxFor a good explanation of SIMD, I recommend Casey Muratori's Handmade Hero video about the subject. There's a second one as well that is also worth watching. Random google searches for generic textures are how I found most of them, but I got the spritesheet liquid texture from Gustav Hagerling's Unity Asset page.