Physically Based Rendering
Preface
Now here's a topic that sounds complicated! The discovery of the math behind it no-doubt is, but for the purposes of implementation, it's actually not that bad. The hardest part is finding any information about how to implement it in a game engine. I haven't actually found a full example yet, so I'm going to share my current interpretation of it. I say 'interpretation' because there are pieces to the equations that are interchangeable with others, and there are pieces that you can choose whether or not to include. I know that sounds really vague, but it'll make more sense as you read through this. A lot of this process is exploration and finding what you think looks best. In this tutorial, I'm making the assumption that you already have a basic lighting system implemented.Before continuing, make sure you read this paper on physically based rendering. Seriously, read it from top to bottom. There's a lot of great information here and the author does a fantastic job of explaining how PBR works. I don't go over a lot of specifics about why it works in the following tutorial because I'm assuming you will have read this to understand it.
Overview
If we want physically based lighting, we want a physically-based BRDF. That's 'Bidirectional Reflectance Distribution Function' which is the fancy way of describing how light behaves when in contact with objects. If you've already done simple lighting for your scenes, chances are you're using a Phong or Blinn-Phong lighting model. This is just a more mature replacement for that. The core model is still the same:Color = Ambient Factor + Diffuse Factor + Specular Factor + Environment Factor
What changes is how these are calculated, and how you choose to calculate these will vary your final result.
Specular Factor
I'm starting here because this is the factor that makes the biggest difference in material variance, and is the core of this lighting model. The BRDF looks like this: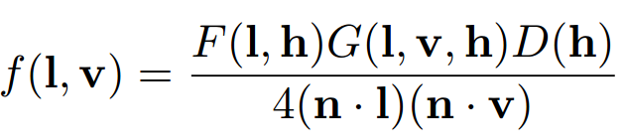
Easy right? Hell no! Not at first glance at least, but it's a lot simpler than it looks. We're going to look at it in a different way:
Specular = Fresnel Reflectance Term * Geometry Term * Normal Distribution Term
The Fresnel Reflectance function describes an objects tendency to reflect at glancing angles. It is the only one of the 3 pieces that seems to have a singular, widely accepted implementation:

Where specular is your specular color (note that this is not the classic specular color that you're used to), viewDir is your view direction, and half is the half-way vector found by the normalized addition of your view direction and light direction. This is known as the Schlick Approximation of Fresnel Reflectance.
Next comes the geometry term, which describes microfacet shadowing based on roughness and distribution. This one has several possible implementations: Implicit, Neumann, Cook-Torrance, Smith, and more. For my particular implementation I'm using Smith GGX simply because I felt that it looked the best. You may feel differently, so try a few!

Finally, we need the normal distribution term, which describes the distribution of microfacets across the surface of the object. Again, there are several different calculations for this, but I use the Trowbridge-Reitz calculation for mine:

Alright. Now we have all the pieces! But we're not done yet. As you noticed, we require a roughness variable which describes, on a 0 – 1 non-linear scale, the smoothness/roughness of a surface. That's pretty easy for an artist to understand from their side. However, the 'specular' is more complex, as you can see from the Disney article I linked in the preface. Basically it comes down to non-metals having grayscale specular values (resulting in white highlights like you'd see with plastic), while metals have a more colored specular (depending on the metal). The current Unity3D solution is exposure of a specular color variable, which expects the user to understand physically based lighting enough to know to use grayscale for non-metals and colored spec for metals. While this isn't particularly difficult to look up and understand, I've much preferred the addition of a "metallic" variable in the style of UDK, since it better describes materials. I believe I deviate a bit from how it functions, however. Here are some basic rules for how this variable should behave:
- -Metallic should be 0 or 1 for 99% of materials.
- -Metallic should cancel out subsurface reflection (diffuse)
- -Metallic should allow for a colored specular
- -Metallic should be reflective
So what does this mean for our specular term? For this piece, metallic only really effects the fresnel reflectance. I choose to solve this by using my metallic variable when calculating specular:
float specMetallic = max(metallic, 0.03);
float3 surfaceSpec = lerp(float3(1.0, 1.0, 1.0), surface.specular.rgb, metallic);
This isn't the "correct" solution exactly, but since most non-metals (metallic = 0) fall between 0.02 and 0.05 specular, I set the resulting spec to 0.03 for all of them. Eventually I might change this, but for simplicity this works for now. Then, using the original metallic value, I either make the surface specular color white (all non-metals have white specular), or the specular color that we pass in. That 'surface.specular.rgb' color depends on you. Some engines use the diffuse color, some use a separate specular color, and some use a specular texture. I personally think using the base diffuse color works just fine (at least so far), and saves on calculations, so that's what I'm using behind the scenes. I won't be covering how I get these color variables since they're out of the bounds of this topic, and I'm assuming you already have those basics covered.
CalculateSchlickFresnelReflectance(viewDir, half, float3(specMetallic, specMetallic, specMetallic) * surfaceSpec * brdfspecular)
Here you can see how it comes together. Non-metals will input [0.03, 0.03, 0.03] because our specMetallic is 0.03 and surfaceSpec is [1.0, 1.0, 1.0]. Metals will input [surfaceSpec.r, surfaceSpec.g, surfaceSpec.b] because specMetallic is 1.0 and surfaceSpec is your specular color (in my case surface.specular.rgb). brdfspecular is an optional specular scaling factor to control how strong you want the spec to be. You may or may not find that you want to use this, I go back and forth about needing it so it could just be a scene-dependent thing.
Phew! That was a lot just for specular right? You'll see how much it pays off when you put it together though, because the amount of variance you can get with just a couple variables is remarkable. Before moving on to another piece, let's see what the spec calculation looks like all together:

If you have shadows, you'll want to multiply that shadow amount into this equation like I've done with shadowContrib. You also want to multiply this whole thing by your nDotL so that it smoothly fades off the edges of your models.
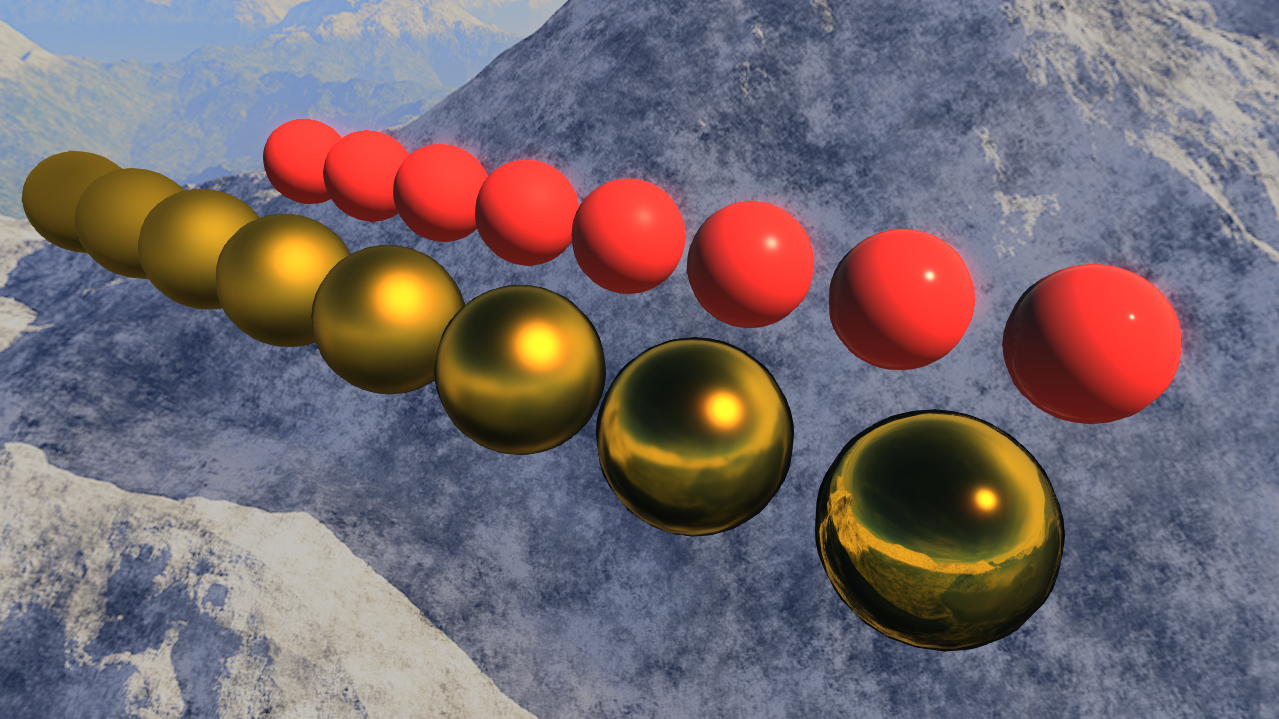
This shows how non-metals behave with modified roughness. It's amazing the amount of variance you can get from a single variable. I recommend bumping up the video quality to see all the details.
This shows how metals behave with modified roughness. Again, so much variance. Again, recommend bumping up the video quality to see all the details!
Diffuse Factor
This next part is much simpler. It's the same diffuse equation that you're used to, but with the metallic value factored in. Since metals don't have subsurface reflection, you want to have something that looks like this:float3 diffuseFactor = surface.albedo.rgb * nDotL * shadowContrib * (1.0 - metallic);
Where 'surface.albedo.rgb' is your calculated diffuse color (for me it's the sampled texture diffuse color multiplied by a diffuse color multiplier). The nDotL and shadow contribution apply here as well just like the specular term. We then multiply it by the inverse of the metallic variable so that we apply it for non-metallic surfaces, and not at all for metallic. I believe there are other equations for the diffuse term that incorporate the roughness factor, but I haven't found a good one yet, so that's it for this one!
Ambient Factor
This is one I wrestle with for the right look, so you may find you want something different than what I use if you include ambient lighting.float3 ambientFactor = ambientLight.rgb * lerp(surface.albedo.rgb, float3(0.2, 0.2, 0.2), metallic);
I use a hemispheric ambient light variable when I draw, and then multiply it by the albedo (base diffuse) term or 0.2 depending on whether or not it's metallic, since I feel like it should still take on a small amount of this to look decent. This is just a guess because I haven't done research on the effect of ambience on metals yet, so play with some different things here and see what you like.
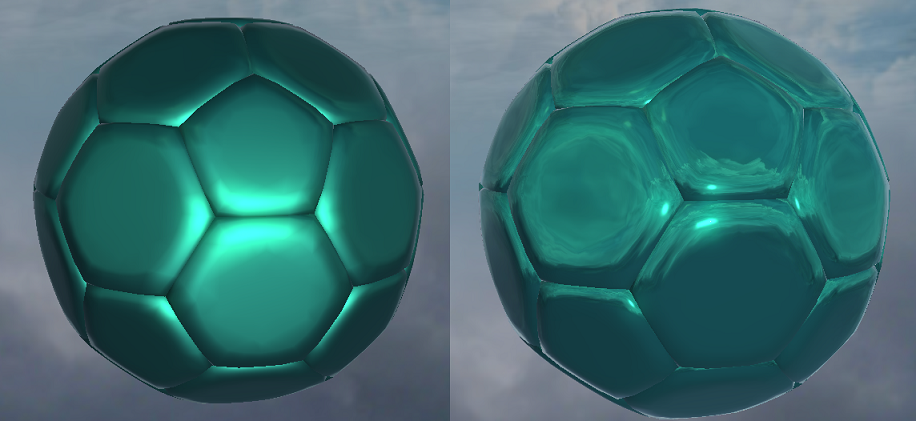
Environment Factor Version 2
I revised my original environmental factor (which you can find at the bottom of this page) in favor of proper image-based rendering via the method demonstrated in this Epic paper: http://blog.selfshadow.com/publications/s2013-shading-course/karis/s2013_pbs_epic_notes_v2.pdfAs I am unaware of any better method than the one implemented in said paper, and it seems solid enough for my needs, I'm using it! I simply run my environment map through the filter they describe, and apply this implementation (modified such that it fits with my setup) in place of my previous iteration, and it works perfectly. I highly recommend reading through that paper and applying the image-based lighting implementation, or another model in the same realm, to your PBR pipeline. Version 1 was great for learning how to somewhat achieve the look we want to see, but ultimately the quality difference between this revision and the original is so massive that I believe it's absolutely necessary to use it to get great results.
Putting It All Together
That's everything! At least at the moment. The final equation below adds all the pieces together. Note that you'll end up wanting to multiply the metallic environmental factor by your shadow contribution like I have here, but not the roughness factor, since it's an additive color over everything.float3 finalColor = diffuseFactor + specularFactor + ambientFactor + envFactor;
I don't claim this to be the perfect physically based rendering solution, nor entirely 'correct'. It's just what I decided looked good after many iterations. That's what's so interesting about it though, because it can and has been done in so many different ways. 80% of this is experimentation, so be sure to try lots of different equations, looks, combinations, etc. Have fun!
References
Disney's SIGGRAPH course: http://blog.selfshadow.com/publications/s2013-shading-course/Unity's physically based shading notes: http://aras-p.info/texts/files/201403-GDC_UnityPhysicallyBasedShading_notes.pdf
Brian Karis's specular BRDF reference: http://graphicrants.blogspot.com/2013/08/specular-brdf-reference.html
And of course, I couldn't have gotten it to look this good without my friend Chris Sydell's help. He's a game designer with a good eye for making things look awesome, and his feedback helped me take this from zero to sixty.
Environment Factor Version 1
This was my first iteration at the environmental factor, before I knew image-based lighting was a thing. As you can see above with V2, proper image-based rendering of your environmental factor makes a massive difference in quality. Thanks Epic!This factor and the specular factor create the biggest visual differences that distinguish between the different surfaces, and we need this piece to have reflections both on our metals and non-metals. We'll break this up into two parts. One is our metallic environmental factor, and the other is our roughness/smoothness environmental factor. Before we dive in, you'll need to make sure you have a cubemap reflection implementation in your engine since I'm assuming you have that for these next steps. If you don't, I'll eventually have a quickie skybox reflection tutorial, but there are plenty of resources online for how to do that, so check them out! My reflections aren't currently high-tech because I haven't had the urge to dig deeper, so they are simple skybox reflections - meaning they only show reflections of the skybox, and not any of the objects in the scene, but that's good enough for now.
The first thing you'll want to do with your cubemap is mip the hell out of it. ID3D11DeviceContext::GenerateMips will do this for you, assuming you create your texture with the D3D11_RESOURCE_MISC_GENERATE_MIPS flag set. I get mine all the way down to 4x4. The reason we do this is because rougher surfaces have blurrier reflections, and mipping is the easiest and cheapest way to blur a cubemap (as far as I know). The blurred reflections won't be the best you've ever seen, but it is good enough to start with and you can improve on it later, assuming you don't already have something better. You can then use SampleLevel in your shader to get the mip based on your roughness variable.
float mip = (pow((roughness - 1.0), 3.0) + 1.0) * 7.0; //7 is because I have 7 mips
float4 reflectionColor = EnvironmentMap.SampleLevel(EnvironmentSampler, reflectionVector, mip);
The function above is non-linear because the roughness factor isn't either. I found that this cubic equation worked well for me after trying some different things. Now that we have our surface reflection color, we can find our environmental factors. The first is applied to metallic and non-metallic surfaces alike, and is based on our roughness. We take the reflection color (which we've already blurred based on roughness), and multiply it by and edge fresnel falloff based on our view, and apply more of it as the surface gets smoother.
float3 envFactorRoughness = surface.env.rgb * pow(1.0 - saturate(dot(surface.normal, -viewDir)), 5.0) * (1.0 - roughness);
Edit: This doesn't look quite right on metallic things, so right after the above line, I've added this:
envFactorRoughness *= lerp(float3(1.0, 1.0, 1.0), surface.albedo.rgb, metallic);
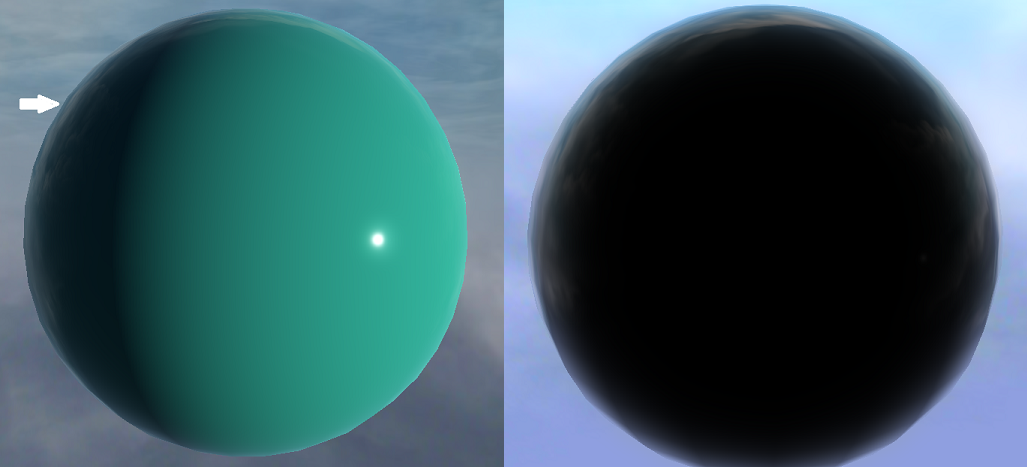
The goal is to produce the above effect - a kind of rim reflectance. The left image is everything together, the right is just that specific factor.
The second environmental factor is for metallic reflection. We take the same reflection color and multiply it by our surface diffuse to color the reflection. Then, we multiply it by our nDotL so that it has a nice falloff. We only apply it if it's a metal (metallic = 1.0), and apply more of it based on how smooth the surface is.
float3 envFactorMetallic = surface.env.rgb * surface.albedo.rgb * nDotL * metallic * (1.0 - roughness);
Now we have a reflection on our metallic surfaces based on their roughness.