Water Walkthrough
Intro
For almost as long as I can remember, I've been fascinated with water in games. I was lucky to be able to experience major evolutions in water rendering as a gamer, and for a long time, I thought that great looking water in games was the coolest thing you could do. I told myself after I started playing with graphics programming and doing a couple basic tutorials, that one day I'd create some good looking water myself. I was reminded of that recently, so I gave it a shot! What follows in this post is nothing particularly difficult in itself, nor anything new or groundbreaking, just lots of little details and tricks you can use to make your water look more interesting. I'll be covering water features from a base grid mesh all the way through the tessellation pipeline and pixel shader, stopping along the way to describe each facet in detail. You can find the complete code as well at the end, along with all texture resources I use. Some early disclaimers, none of this is in any way physically based, and I'll be making liberal use of what I call "creative freedoms*" to achieve the final look.*Making shit up.
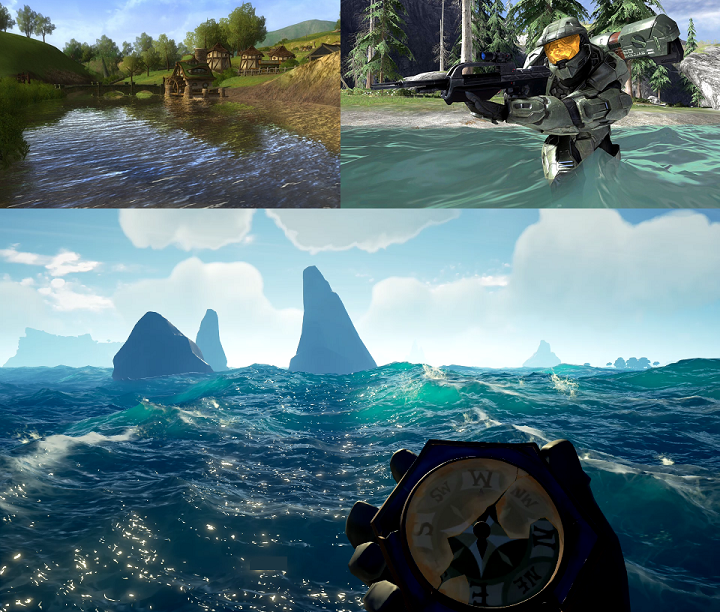
Top: Some of my favorite water growing up. LOTRO's water aged very well, despite the geo being massive flat planes, and Halo 3 had water that deformed nicely for the time, which to me was awesome. Bottom: The pinnacle of water rendering in games so far (in my opinion): Sea of Thieves. I could sit and watch that water forever.
Grid Mesh Setup
Let's start by creating some geometry that we can work with. The following code sets up a flat grid with X/Y number of tiles, and with texture coordinates tiling X/Y times. For my example video I used 50, 50, 5.0, 5.0 as the inputs for this function. There's faster ways to set up this vertex data, but this reads well in order to see what's going on. Really the only thing of note is that I'm setting up two pairs of texture coordinates. The first pair is UV'd per individual tile to give it some initial tiling, the second pair is UV'd over the whole grid from one corner to the other.void GetGridMesh(uint32 xTiles, uint32 zTiles, float texTileX, float texTileZ) { uint32 vertexCount = xTiles * zTiles * 6; //MeshVertex is just 2 float4's, one for position, one for texcoords MeshVertex *meshData = new MeshVertex[vertexCount]; float oneOverXTiles = 1.0f / (float)xTiles; float oneOverZTiles = 1.0f / (float)zTiles; for (uint32 x = 0; x < xTiles; x++) { for (uint32 z = 0; z < zTiles; z++) { uint32 tileIndex = (x * zTiles + z) * 6; float xBeginTile = (oneOverXTiles * (float)x) * texTileX; float xEndTile = (oneOverXTiles * (float)(x + 1)) * texTileX; float zBeginTile = (oneOverZTiles * (float)z) * texTileZ; float zEndTile = (oneOverZTiles * (float)(z + 1)) * texTileZ; float xBegin = (oneOverXTiles * (float)x); float xEnd = (oneOverXTiles * (float)(x + 1)); float zBegin = (oneOverZTiles * (float)z); float zEnd = (oneOverZTiles * (float)(z + 1)); meshData[tileIndex].Position = Vector4((float)x, 0.0f, (float)z, 1.0f); meshData[tileIndex].TexCoord = Vector4(xBeginTile, zBeginTile, xBegin, zBegin); tileIndex++; meshData[tileIndex].Position = Vector4((float)x, 0.0f, (float)z + 1.0f, 1.0f); meshData[tileIndex].TexCoord = Vector4(xBeginTile, zEndTile, xBegin, zEnd); tileIndex++; meshData[tileIndex].Position = Vector4((float)x + 1.0f, 0.0f, (float)z, 1.0f); meshData[tileIndex].TexCoord = Vector4(xEndTile, zBeginTile, xEnd, zBegin); tileIndex++; meshData[tileIndex].Position = Vector4((float)x, 0.0f, (float)z + 1.0f, 1.0f); meshData[tileIndex].TexCoord = Vector4(xBeginTile, zEndTile, xBegin, zEnd); tileIndex++; meshData[tileIndex].Position = Vector4((float)x + 1.0f, 0.0f, (float)z + 1.0f, 1.0f); meshData[tileIndex].TexCoord = Vector4(xEndTile, zEndTile, xEnd, zEnd); tileIndex++; meshData[tileIndex].Position = Vector4((float)x + 1.0f, 0.0f, (float)z, 1.0f); meshData[tileIndex].TexCoord = Vector4(xEndTile, zBeginTile, xEnd, zBegin); tileIndex++; } } //do whatever you do to set up your vertex buffers :-) }
Shader Inputs
Let's quickly cover the inputs that will be used for the whole shader pipeline for the water. For simplicity, we'll use one big ol' constant buffer that has everything we want, which is a lot. Don't worry about what some of these vague ones like "ssrSettings" mean, I'll cover them as we go.cbuffer WaterBuffer : register(b0) { matrix modelMatrix; matrix viewMatrix; matrix projectionMatrix; matrix viewInverseMatrix; matrix projectionInverseMatrix; matrix viewProjInvMatrix; float4 lightDirection; float4 waterSurfaceColor; float4 waterRefractionColor; float4 ssrSettings; float4 normalMapScroll; float2 normalMapScrollSpeed; float refractionDistortionFactor; float refractionHeightFactor; float refractionDistanceFactor; float depthSofteningDistance; float foamHeightStart; float foamFadeDistance; float foamTiling; float foamAngleExponent; float roughness; float reflectance; float specIntensity; float foamBrightness; float tessellationFactor; float dampeningFactor; float time; };
Next, the textures:
Texture2D WaterNormalMap1 : register(t0);
Texture2D WaterNormalMap2 : register(t1);
Texture2D HDRMap : register(t2);
Texture2D DepthMap : register(t3);
Texture2D NormalMap : register(t4);
TextureCube EnvironmentMap : register(t5);
Texture2D WaterFoamMap : register(t6);
Texture2D WaterNoiseMap : register(t7);
WaterNormalMap1/2 are normal maps we'll be scrolling to give motion to the water surface in addition to the deformation. HDRMap, DepthMap, and NormalMap are the frame buffers from the gbuffer pass, after the lighting pass (so that reflections will look correct), but before the post processing pass. The water itself will be forward rendered. Depending on what your buffer setup is, you may want to copy the HDRMap and DepthMap and use the copies as inputs for this pass, because we'll be rendering to both a color target and depth buffer, and you won't really want water to contribute to itself. EnvironmentMap is the cube map of the skybox, which we'll use for reflections. WaterFoamMap and WaterNoiseMap will be used to add foam and add some water-like fakery to both the foam and the lighting. I'll make an added note here that I'm using a reversed depth buffer here, so if you aren't doing that, you'll need to flip the signs on some of the depth-comparison ops in the shaders.
Finally, the samplers:
SamplerState LinearWrapSampler : register(s0);
SamplerState PointClampSampler : register(s1);
SamplerState LinearClampSampler : register(s2);
These samplers are exactly what you'd expect them to be, we just need a couple different kinds to sample the different textures.
Vertex Shader
The vertex shader kicks us off. It doesn't actually do anything apart from shuffling things along to the hull shader to begin the tessellation steps. We could probably do some interesting things here, but for now we'll just pass the data and keep going.struct VertexInput { float4 position : POSITION; float4 texCoord0 : TEXCOORD0; }; struct HullInput { float4 position : POSITION; float4 texCoord0 : TEXCOORD0; }; HullInput WaterVertexShader(VertexInput input) { HullInput output; output.position = input.position; output.texCoord0 = input.texCoord0; return output; }
Hull Shader
Next comes the hull shader and tessellation patch function. This is doing the most dirt-simple hardware tessellation you can do, basically. In fact, since it's just a constant being passed in for the tessellation factor, it might as well have been tessellated on the CPU, but what this allows for is easily increasing/decreasing tessellation based on distance from the camera. I'm just playing with a single water plane though, so I haven't had to put much else into this step yet. I'd quickly explain this step and the settings used, but frankly I couldn't do it any better than Nathan Reed did in this post. In fact, this is the resource I used to remind myself how to set up this step!struct DomainInput { float4 position : POSITION; float4 texCoord0 : TEXCOORD0; }; TessellationPatch WaterTessellation(InputPatch<HullInput, 3> inputPatch, uint patchId : SV_PrimitiveID) { TessellationPatch output; output.edges[0] = output.edges[1] = output.edges[2] = tessellationFactor; output.inside = tessellationFactor; return output; } [domain("tri")] [partitioning("fractional_odd")] [outputtopology("triangle_cw")] [outputcontrolpoints(3)] [maxtessfactor(15.0)] [patchconstantfunc("WaterTessellation")] DomainInput WaterHullShader(InputPatch<HullInput, 3> patch, uint pointId : SV_OutputControlPointID, uint patchId : SV_PrimitiveID) { DomainInput output; output.position = patch[pointId].position; output.texCoord0 = patch[pointId].texCoord0; return output; }
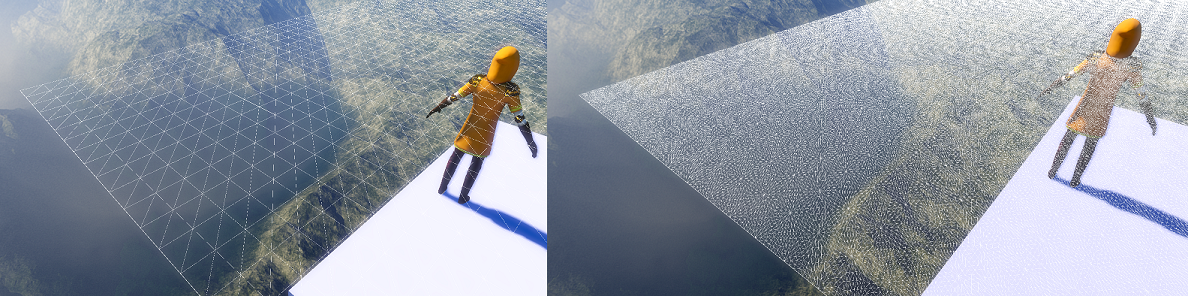
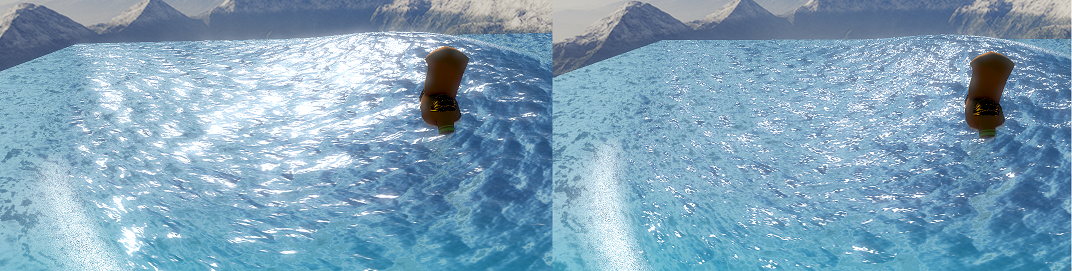
Here's the impact of the tessellation factor. Left is with a tessellation factor of 1 (base geometry), and right is with high tessellation with a factor of 7.
Wave Calculation
Before we get to the domain shader, we'll set up a function for calculating waves. The following is a straight up translation from this older but very much still relevant GPU Gems chapter on Gerstner waves which was recommended to me. Originally, I was just scrolling a couple of quality heightmaps together, which frankly looked pretty good. The problem was that calculating normals and such from heightmaps was a bit iffy and required a fair number of samples to make lighting look okay, and didn't necessarily scale as well to more waves. In my sample, as you'll see, you can get a decent look with very few waves (2 in my case). If you want something more believable under scrutiny, you'll want more of them, and you'll want to phase them out/in with new waves to reduce noticeable patterns. The only thing in here that you won't find in the GPU gems is the edge dampening. This is used to clamp the water motion at the edges of the plane so that the entire plane itself isn't moving with the waves. This is also a trivial solution (when it makes sense) to having different tessellation factors from one water plane to the next; if you don't move the edges, you won't have cracks.struct WaveResult { float3 position; float3 normal; float3 binormal; float3 tangent; }; struct Wave { float3 direction; float steepness; float waveLength; float amplitude; float speed; }; WaveResult CalculateWave(Wave wave, float3 wavePosition, float edgeDampen) { WaveResult result; float frequency = 2.0 / wave.waveLength; float phaseConstant = wave.speed * frequency; float qi = wave.steepness / (wave.amplitude * frequency * numWaves); float rad = frequency * dot(wave.direction.xz, wavePosition.xz) + time * phaseConstant; float sinR = sin(rad); float cosR = cos(rad); result.position.x = wavePosition.x + qi * wave.amplitude * wave.direction.x * cosR * edgeDampen; result.position.z = wavePosition.z + qi * wave.amplitude * wave.direction.z * cosR * edgeDampen; result.position.y = wave.amplitude * sinR * edgeDampen; float waFactor = frequency * wave.amplitude; float radN = frequency * dot(wave.direction, result.position) + time * phaseConstant; float sinN = sin(radN); float cosN = cos(radN); result.binormal.x = 1 - (qi * wave.direction.x * wave.direction.x * waFactor * sinN); result.binormal.z = -1 * (qi * wave.direction.x * wave.direction.z * waFactor * sinN); result.binormal.y = wave.direction.x * waFactor * cosN; result.tangent.x = -1 * (qi * wave.direction.x * wave.direction.z * waFactor * sinN); result.tangent.z = 1 - (qi * wave.direction.z * wave.direction.z * waFactor * sinN); result.tangent.y = wave.direction.z * waFactor * cosN; result.normal.x = -1 * (wave.direction.x * waFactor * cosN); result.normal.z = -1 * (wave.direction.z * waFactor * cosN); result.normal.y = 1 - (qi * waFactor * sinN); result.binormal = normalize(result.binormal); result.tangent = normalize(result.tangent); result.normal = normalize(result.normal); return result; }
Domain Shader
To start, we do standard interpolation to get the starting position and texcoord info for this vertex. Next, for simplicity's sake, I have my waves set up in the shader. In an actual use case, you'd want to feed these in through a buffer (structured or otherwise). I then calculate the edge dampening to clamp down the edges like I mentioned earlier. The dampeningFactor is used to control how harsh that falloff is. Next, I accumulate the wave data in a loop, and then normalize everything (including the position, so that I don't stack the base position for each wave calculation). Lastly I set up a bunch of vertex data which will be useful and make more sense in the next pass.static const uint numWaves = 2;
struct PixelInput
{
    float4 position : SV_POSITION;
    float3 normal : NORMAL;
    float3 tangent : TANGENT;
    float3 binormal : BINORMAL;
    float4 positionView : TEXCOORD0;
    float4 texCoord0 : TEXCOORD1;
    float4 screenPosition : TEXCOORD2;
    float4 positionWorld : TEXCOORD3;
    float4 worldNormalAndHeight : TEXCOORD4;
};
[domain("tri")]
PixelInput WaterDomainShader(TessellationPatch input, float3 uvwCoord : SV_DomainLocation, const OutputPatch<DomainInput, 3> patch)
{
    PixelInput output;
    output.position = uvwCoord.x * patch[0].position + uvwCoord.y * patch[1].position + uvwCoord.z * patch[2].position;
    output.texCoord0 = uvwCoord.x * patch[0].texCoord0 + uvwCoord.y * patch[1].texCoord0 + uvwCoord.z * patch[2].texCoord0;

    Wave waves[numWaves];
    waves[0].direction = float3(0.3, 0, -0.7);
    waves[0].steepness = 1.79;
    waves[0].waveLength = 3.75;
    waves[0].amplitude = 0.85;
    waves[0].speed = 1.21;

    waves[1].direction = float3(0.5, 0, -0.2);
    waves[1].steepness = 1.79;
    waves[1].waveLength = 4.1;
    waves[1].amplitude = 0.52;
    waves[1].speed = 1.03;

    float dampening = 1.0 - pow(saturate(abs(output.texCoord0.z - 0.5) / 0.5), dampeningFactor);
    dampening *= 1.0 - pow(saturate(abs(output.texCoord0.w - 0.5) / 0.5), dampeningFactor);

    WaveResult finalWaveResult;
    finalWaveResult.position = float3(0,0,0);
    finalWaveResult.normal = float3(0,0,0);
    finalWaveResult.tangent = float3(0,0,0);
    finalWaveResult.binormal = float3(0,0,0);

    for(uint waveId = 0; waveId < numWaves; waveId++)
    {
        WaveResult waveResult = CalculateWave(waves[waveId], output.position.xyz, dampening);
        finalWaveResult.position += waveResult.position;
        finalWaveResult.normal += waveResult.normal;
        finalWaveResult.tangent += waveResult.tangent;
        finalWaveResult.binormal += waveResult.binormal;
    }

    finalWaveResult.position -= output.position.xyz * (numWaves - 1);
    finalWaveResult.normal = normalize(finalWaveResult.normal);
    finalWaveResult.tangent = normalize(finalWaveResult.tangent);
    finalWaveResult.binormal = normalize(finalWaveResult.binormal);

    output.worldNormalAndHeight.w = finalWaveResult.position.y - output.position.y;
    output.position = float4(finalWaveResult.position, 1.0);
    output.positionWorld = mul(output.position, modelMatrix);
    output.positionView = mul(output.positionWorld, viewMatrix);
    output.position = mul(output.positionView, projectionMatrix);
    output.screenPosition = output.position;
    output.normal = normalize(mul(finalWaveResult.normal, (float3x3)modelMatrix));
    output.worldNormalAndHeight.xyz = output.normal;
    output.normal = normalize(mul(float4(output.normal, 0.0), viewMatrix).xyz);
    output.tangent = normalize(mul(finalWaveResult.tangent, (float3x3)modelMatrix));
    output.tangent = normalize(mul(float4(output.tangent, 0.0), viewMatrix).xyz);
    output.binormal = normalize(mul(finalWaveResult.binormal, (float3x3)modelMatrix));
    output.binormal = normalize(mul(float4(output.binormal, 0.0), viewMatrix).xyz);

    return output;
}
Pixel Shader
This shader is on the longer side, so I'll go through each section in chunks and then bring it all together at the end. Let's get started!float4 WaterPixelShader(PixelInput input) : SV_TARGET { input.normal = normalize(input.normal); input.tangent = normalize(input.tangent); input.binormal = normalize(input.binormal); float2 normalMapCoords1 = input.texCoord0.xy + time * normalMapScroll.xy * normalMapScrollSpeed.x; float2 normalMapCoords2 = input.texCoord0.xy + time * normalMapScroll.zw * normalMapScrollSpeed.y; float2 hdrCoords = ((float2(input.screenPosition.x, -input.screenPosition.y) / input.screenPosition.w) * 0.5) + 0.5; float3 normalMap = (WaterNormalMap1.Sample(LinearWrapSampler, normalMapCoords1).rgb * 2.0) - 1.0; float3 normalMap2 = (WaterNormalMap2.Sample(LinearWrapSampler, normalMapCoords2).rgb * 2.0) - 1.0; float3x3 texSpace = float3x3(input.tangent, input.binormal, input.normal); float3 finalNormal = normalize(mul(normalMap.xyz, texSpace)); finalNormal += normalize(mul(normalMap2.xyz, texSpace)); finalNormal = normalize(finalNormal);
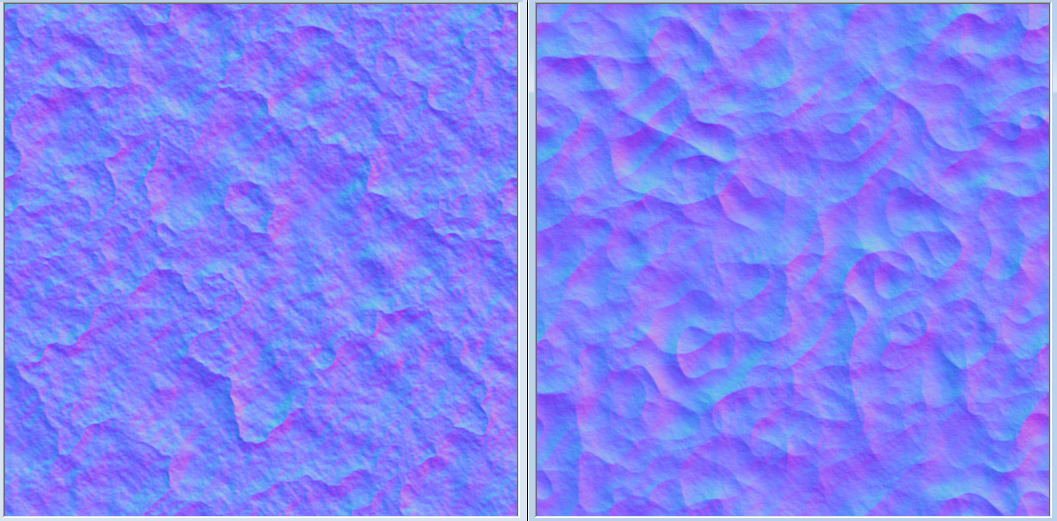
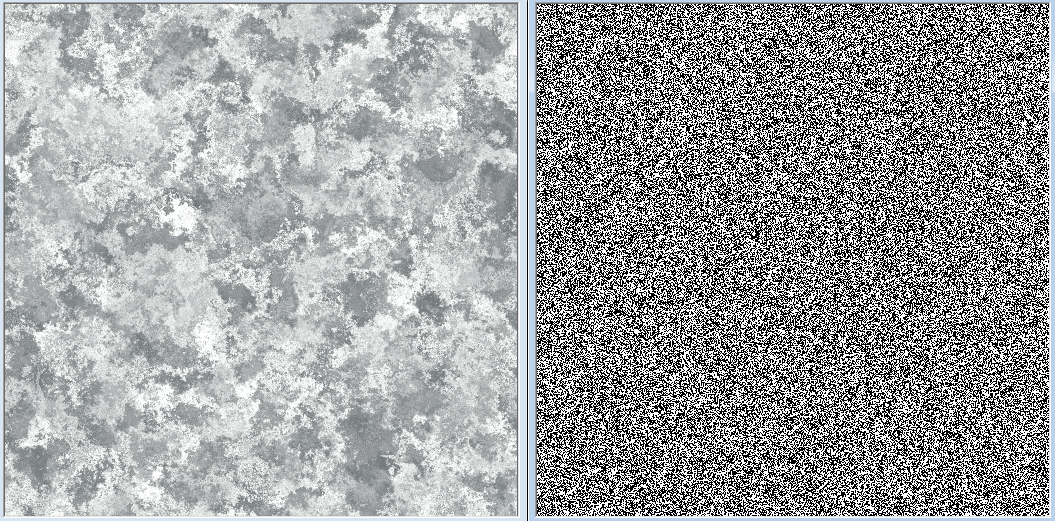
We start by normalizing the normal/tangent/binormal from the input. Easy to forget, but the data like normals are no longer unit vectors post-interpolation. Sometimes this is less noticeable than others, but nonetheless worth correcting. Next, we scroll the sub-tile texture coordinates in the desired scroll direction, and multiply by their respective scroll speeds. Scrolling normal maps for water is always a good idea, and you'll probably see it in every standard water solution you find, because it helps lend motion to the surface of the water, in addition to the geometric motion. We combine the results of these two normal maps into the final normal we'll be using for this pixel. In there you'll notice I also calculated another texture coordinate (hdrCoords) so that we can sample the HDR input map and depth map later. Here is what the normal maps I'm using look like:
float linearRoughness = roughness * roughness;
float3 viewDir = -normalize(input.positionView.xyz);
float3 lightDir = -lightDirection.xyz;
float3 half = normalize(viewDir + lightDir);
float nDotL = saturate(dot(finalNormal, lightDir));
float nDotV = abs(dot(finalNormal, viewDir)) + EPSILON;
float nDotH = saturate(dot(finalNormal, half));
float lDotH = saturate(dot(lightDir, half));

float3 f0 = 0.16 * reflectance * reflectance;
float normalDistribution = CalculateNormalDistributionGGX(linearRoughness, nDotH);
float3 fresnelReflectance = CalculateSchlickFresnelReflectance(lDotH, f0);
float geometryTerm = CalculateSmithGGXGeometryTerm(linearRoughness, nDotL, nDotV);

float specularNoise = WaterNoiseMap.Sample(LinearWrapSampler, normalMapCoords1 * 0.5).r;
specularNoise *= WaterNoiseMap.Sample(LinearWrapSampler, normalMapCoords2 * 0.5).r;
specularNoise *= WaterNoiseMap.Sample(LinearWrapSampler, input.texCoord0.xy * 0.5).r;

float3 specularFactor = (geometryTerm * normalDistribution) * fresnelReflectance * specIntensity * nDotL * specularNoise;
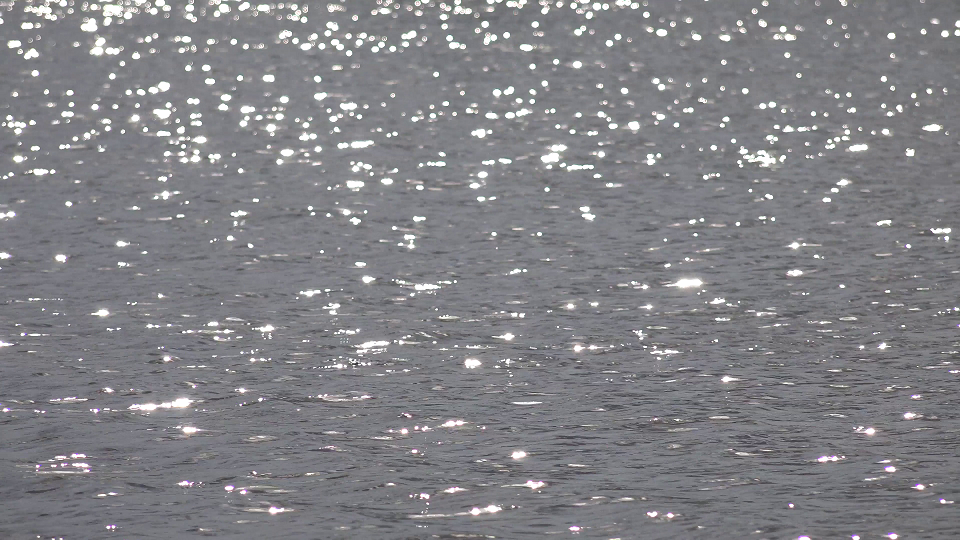
The next step, shown above, is where calculate the specular term in arguably one of the least worthwhile ways for a shader like this. But hey, I tried it, so I'm sharing it! Anyone familiar with physically based specular models will recognize what I'm doing. If you don't, you can find exactly what I've done here in Filament's PBR documentation, which is easily some of the best PBR documentation you'll find anywhere online. That said, you could (and maybe probably should) replace it with some simpler old-school specular calculation, because what I do next is basically destroy it with some noise (one of those creative freedoms I was talking about). Standard lighting models don't necessarily translate all that well to water. It can end up looking very glossy and plastic-like, having much more form than it really should. Water in real life looks much more spotty specular-wise, like this:
So here, I'm sampling some noise with three different sets of texture coordinates to try and achieve that sparkling look that defines water specularity. You often see tricks like this when people do things like snow rendering, to get those glints of light being reflected. By doing this, I'm still keeping specular light where it would have been, but I'm scattering the light reflected with noise. Here's what it looks like, before and after this is applied:
Far from perfect since I'm just using some noise textures that felt like they fit well and applying some randomized offsets to sample them, but it does a pretty decent job, especially while the waves are in motion.
Next, we'll add in some screen space reflections. What I'm doing below is a pretty simple nothing-fancy implementation of SSR. Just a ray-march and walk-back approach to try and find a decent sample to reflect. As this is a walkthrough for water and not SSR (a large topic on its own), I won't go too far into the details, but if you'd like to check out a good source on that, see Morgan McGuire's post here.
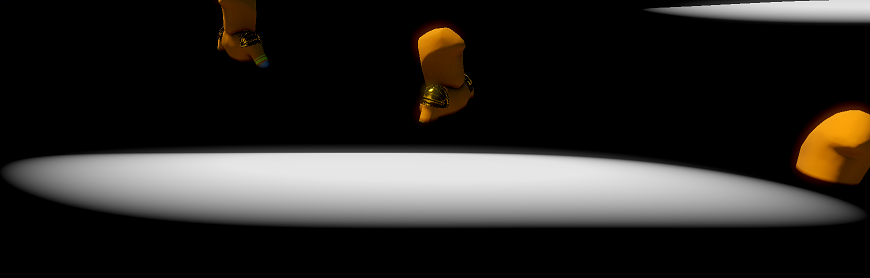
float sceneZ = 0;
float stepCount = 0;
float forwardStepCount = ssrSettings.y;
float3 rayMarchPosition = input.positionView.xyz;
float4 rayMarchTexPosition = float4(0,0,0,0);
float3 reflectionVector = normalize(reflect(-viewDir, finalNormal));

while(stepCount < ssrSettings.y)
{
    rayMarchPosition += reflectionVector.xyz * ssrSettings.x;
    rayMarchTexPosition = mul(float4(-rayMarchPosition, 1), projectionMatrix);

    if(abs(rayMarchTexPosition.w) < EPSILON)
    {
        rayMarchTexPosition.w = EPSILON;
    }

    rayMarchTexPosition.xy /= rayMarchTexPosition.w;
    rayMarchTexPosition.xy = float2(rayMarchTexPosition.x, -rayMarchTexPosition.y) * 0.5 + 0.5;

    sceneZ = DepthMap.SampleLevel(PointClampSampler, rayMarchTexPosition.xy, 0).r;
    sceneZ = GetViewPositionFromDepth(rayMarchTexPosition.xy, sceneZ, projectionInverseMatrix).z;

    if (sceneZ <= rayMarchPosition.z)
    {
        forwardStepCount = stepCount;
        stepCount = ssrSettings.y;
    }
    else
    {
        stepCount++;
    }
}

if (forwardStepCount < ssrSettings.y)
{
    stepCount = 0;
    while(stepCount < ssrSettings.z)
    {
        rayMarchPosition -= reflectionVector.xyz * ssrSettings.x / ssrSettings.z;
        rayMarchTexPosition = mul(float4(-rayMarchPosition, 1), projectionMatrix);

        if(abs(rayMarchTexPosition.w) < EPSILON)
        {
            rayMarchTexPosition.w = EPSILON;
        }

        rayMarchTexPosition.xy /= rayMarchTexPosition.w;
        rayMarchTexPosition.xy = float2(rayMarchTexPosition.x, -rayMarchTexPosition.y) * 0.5 + 0.5;

        sceneZ = DepthMap.SampleLevel(PointClampSampler, rayMarchTexPosition.xy, 0).r;
        sceneZ = GetViewPositionFromDepth(rayMarchTexPosition.xy, sceneZ, projectionInverseMatrix).z;

        if(sceneZ > rayMarchPosition.z)
        {
            stepCount = ssrSettings.z;
        }
        else
        {
            stepCount++;
        }
    }
}

float3 ssrReflectionNormal = DecodeSphereMap(NormalMap.Sample(PointClampSampler, rayMarchTexPosition.xy).xy);
float2 ssrDistanceFactor = float2(distance(0.5, hdrCoords.x), distance(0.5, hdrCoords.y)) * 2;
float ssrFactor = (1.0 - abs(nDotV))
                  * (1.0 - forwardStepCount / ssrSettings.y)
                  * saturate(1.0 - ssrDistanceFactor.x - ssrDistanceFactor.y)
                  * (1.0 / (1.0 + abs(sceneZ - rayMarchPosition.z) * ssrSettings.w))
                  * (1.0 - saturate(dot(ssrReflectionNormal, finalNormal)));
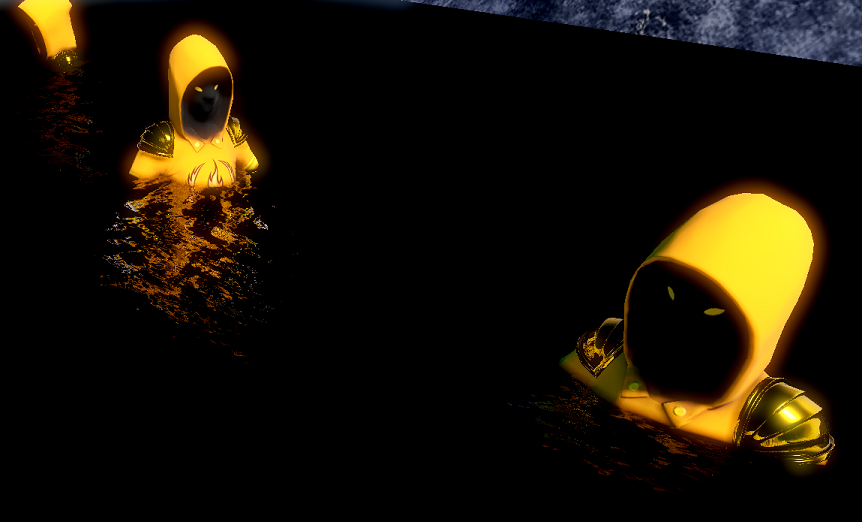
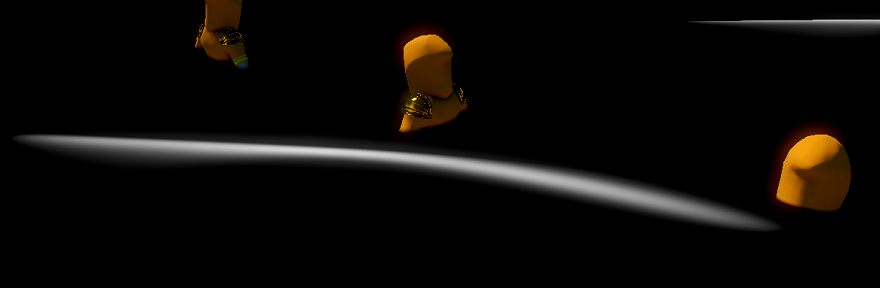
The influences on how much screen space reflection should be shown are line-by-line in the calculation of ssrFactor. The point being to lessen the artifacts in cases where SSR commonly falls over, like if we've marched a lot but never found a good value to reflect, or trying to avoid reflecting anything in the foreground. The thing is though, with water as active as what I'm using in my demo, this really doesn't add much to the visuals. Between the wave motion, normal map scrolling, etc, you end up not really noticing it. Here's a look at just the non-skybox SSR results (ignore the bloom blowing out from all the black):
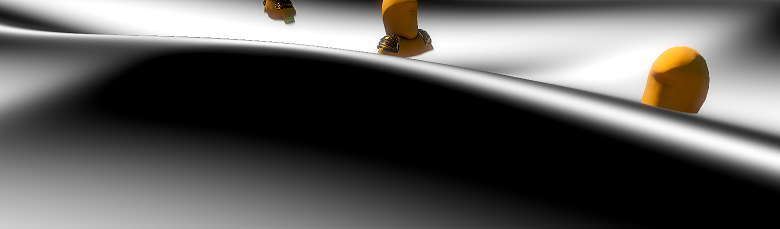
When blended in with the skybox reflections, lighting, foam and everything else, it doesn't make a ton of impact, especially not for the cost. SSR is far more beneficial with stiller water that has a lot of objects worth reflecting in it. So, not the best example here! But it can be an important factor, so I've included it.
float3 reflectionColor = HDRMap.Sample(PointClampSampler, rayMarchTexPosition.xy).rgb;
float3 envReflection = mul(reflectionVector, (float3x3)viewInverseMatrix);
float3 skyboxColor = EnvironmentMap.Sample(LinearClampSampler, envReflection).rgb;
reflectionColor = lerp(skyboxColor, reflectionColor, ssrFactor) * waterSurfaceColor.rgb;
Lastly, we sample the skybox cubemap reflection, blend it with the screen space reflections based on the SSR blend factor, and apply a surface color tint to fake a bit of light absorption. The result is the final reflection color, which we'll be using a bit further down. For now, on to refraction!
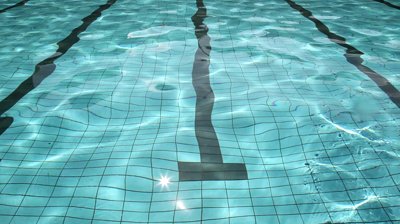
We're all familiar with what refraction looks like in water - that unmistakable wobble under the surface displayed in the image above. We need this visual aspect if we want our water to be remotely convincing when we can see below the surface. A cheap but effective way to achieve this look is to fake it via distortion.
float2 distortedTexCoord = (hdrCoords + ((finalNormal.xz + finalNormal.xy) * 0.5) * refractionDistortionFactor);
float  distortedDepth = DepthMap.Sample(PointClampSampler, distortedTexCoord).r;
float3 distortedPosition = GetWorldPositionFromDepth(distortedTexCoord, distortedDepth, viewProjInvMatrix);
float2 refractionTexCoord = (distortedPosition.y < input.positionWorld.y) ? distortedTexCoord : hdrCoords;
float3 waterColor = HDRMap.Sample(PointClampSampler, refractionTexCoord).rgb * waterRefractionColor.rgb;
There's a number of things to unpack here, so let's take them one at a time. On the first line, we're calculating a new, distorted texture coordinate to sample with. You could use a number of different variables to randomize that distortion sample, but the final water normal is an appropriate one to choose because it best describes the motion of the water. This is a pretty common thing to do with water, but my twist on it is to average two sets of coordinates out of the normal. Why? Because both sets, individually, come with relatively noticeable visual issues when we decide whether or not to use those coordinates (fourth line). Let's look at those issues:
On the left is what you get when you use finalNormal.xz. Notice the clear band that occurs where the surface is close to something in the water. On the right is the result of using finalNormal.xy instead. The banding is gone, but things near the surface appear offset incorrectly at camera angles like this. You might think offhand that averaging these two would get you the worst of both worlds, but in reality it does a good job of muddying this error-prone area of distortion. The result is still not perfect, of course, but it looks much better:
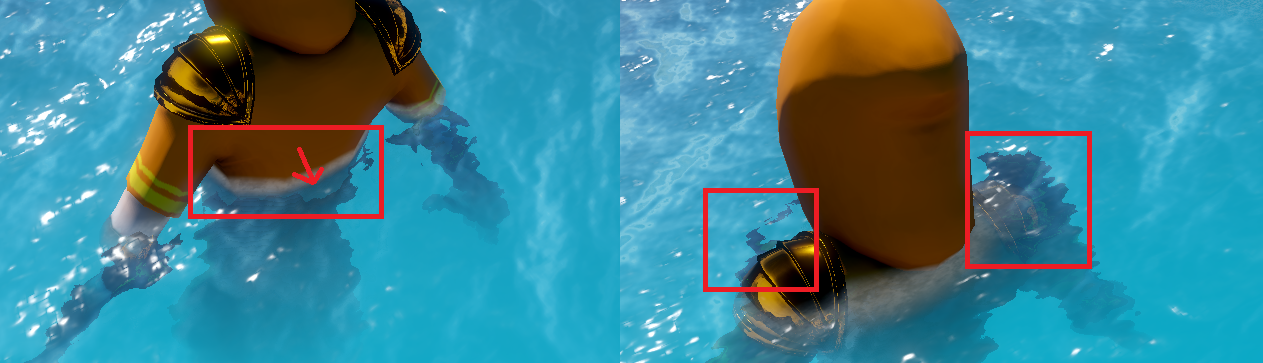
Back to the code, the next two lines grab the world position from the depth information at the distorted coordinate. The fourth line is necessary to ensure that we don't accept a distortion visual from above the water surface. Here's what the distortion visuals look like if we don't do this step. Not good!
Finally, we sample the HDR texture at the appropriate coordinates, and apply the refraction color that we want. We'll be doing more with this color result later. For now, we're going to get the world position of the gbuffer depth at the non-distorted screen coordinate, so that we can use it for a few things:
float sceneDepth = DepthMap.Sample(PointClampSampler, hdrCoords).r;
float3 scenePosition = GetWorldPositionFromDepth(hdrCoords, sceneDepth, viewProjInvMatrix);
float depthSoftenedAlpha = saturate(distance(scenePosition, input.positionWorld.xyz) / depthSofteningDistance);
The first of which is depth softening. This is a simple technique to fade the alpha of the water where it meets the scene geometry by some predetermined distance. This can be seen in all the above images, and this depth softened alpha value ends up going directly into the alpha channel of our output. Note that this technique really only works for water if you do it over a very short distance, because otherwise water starts to fade around scene geometry farther away and noticeably won't make sense.
float3 waterSurfacePosition = (distortedPosition.y < input.positionWorld.y) ? distortedPosition : scenePosition;
waterColor = lerp(waterColor, waterRefractionColor.rgb, saturate((input.positionWorld.y - waterSurfacePosition.y) / refractionHeightFactor));
Back to color now, the above two lines of code is how we fade our faked refraction as the depth of the scene below the water increases. If you had something like a shallow clear pool, you wouldn't necessarily want this, but for giving the feel of deep ocean water, we definitely want it. So, based on the height for that fade that we feed in, we interpolate the distortion color with the underwater color itself.
float waveTopReflectionFactor = pow(1.0 - saturate(dot(input.normal, viewDir)), 3);
float3 waterBaseColor = lerp(waterColor, reflectionColor, saturate(saturate(length(input.positionView.xyz) / refractionDistanceFactor) + waveTopReflectionFactor));
Getting close to the end now! Here is where we mix the reflections with the "refractions". waveTopReflectionFactor is a bit of hackery to make it so that the parts of the waves facing away from the camera are showing reflections, rather than refraction. This gives a smooth fade in and fade out for the refractions (note I'm using the original normal to do this), where we want them. Speaking of, the second line combines that factor with a distance factor that we supply, which makes it so that refractions are only visible within a certain distance of the camera, and fade in from reflections as you get closer, which you can see below:
float3 finalWaterColor = waterBaseColor + specularFactor;
Our final color for the water itself becomes the result of adding that reflection/refraction mixture to the specular factor calculated earlier. The only thing left to add is the foam! Admittedly, I'm not in love with what I did here for foam because real water foam on waves behaves quite differently, but what I have looks better than not having any, and may give you some ideas:
float3 foamColor = WaterFoamMap.Sample(LinearWrapSampler, (normalMapCoords1 + normalMapCoords2) * foamTiling).rgb;
float foamNoise = WaterNoiseMap.Sample(LinearWrapSampler, input.texCoord0.xy * foamTiling).r;
float foamAmount = saturate((input.worldNormalAndHeight.w - foamHeightStart) / foamFadeDistance) * pow(saturate(dot(input.worldNormalAndHeight.xyz, float3(0, 1, 0))), foamAngleExponent) * foamNoise;
First, we sample the foam texture, using the combined normal map coordinates, tiled, to make the foam itself have some additional motion so that it rolls with the waves. Next, we sample the noise texture yet again to introduce a spotting element to the foam in the next line, so that the foam itself looks slightly bubbly rather than a solid sheet. These textures look like this:
In the third line, we do two things in order to put the foam where we want it. First, we decide a height at which foam should begin to appear, and fade that in over a specified distance so that the foam itself will also fade in. This factor visualized looks like this (white is where the foam will be):
That gets us a height factor. The second half of that line gets us the wave factor, which is the desire to have the foam to only appear at the top of the wave. A quick way to do this is to compare the normal of the wave with the global up vector since the tops of the wave will have normals facing up. We take that value to a high exponent to so that the falloff becomes very harsh, since we don't want the foam lower down on the wave. This factor visualized looks like this:
I'm sure you've noticed that, as you'd expect, the flatter parts between waves are also white, but when multiplied with the height factor, that goes away. What we're left with is this:
Not perfect, but not bad! The last piece is to add some foam where the water meets the scene geometry, to make the two meeting look more interesting. We already know where those spots are because we've used depth softening there:
foamAmount += pow((1.0 - depthSoftenedAlpha), 3);
Notice I'm flipping the depth softening value so that there's more foam nearest the scene geometry and fades outward. The power of 3 is a bit arbitrary and makes that fade less of a smooth falloff, which looked better to me. Here's what the final foam looks like:

finalWaterColor = lerp(finalWaterColor, foamColor * foamBrightness, saturate(foamAmount) * depthSoftenedAlpha);
return float4(finalWaterColor, depthSoftenedAlpha);
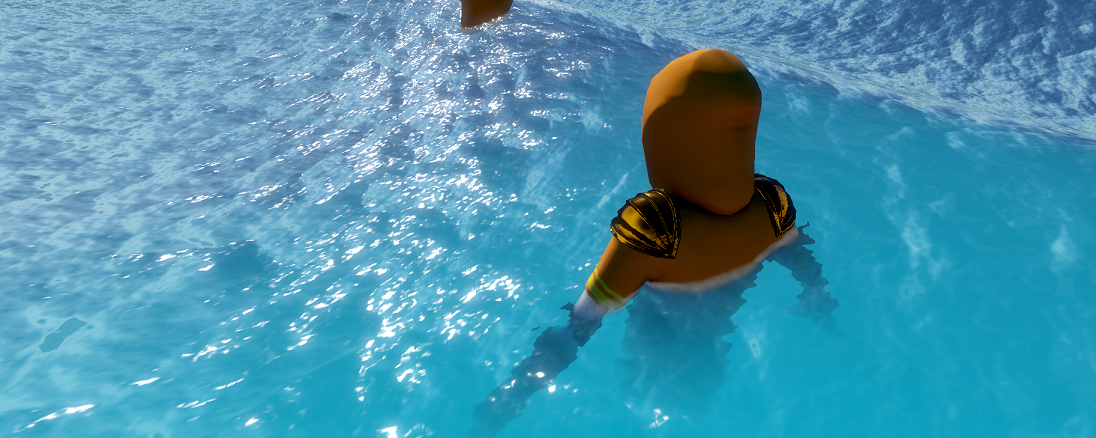
Finally, we blend the water color with the foam color (brightened if you like), based on where the foam and our depth softening is, and output it! Here's the result:
Inputs
There's a lot of inputs into this shader, here are the values I used for the water in the video above. The ones not listed are camera matrices, light direction, and time, which will come from wherever you store that information in your own work.waterBuffer.waterSurfaceColor = Vector4(0.465f, 0.797f, 0.991f, 1.0f); waterBuffer.waterRefractionColor = Vector4(0.003f, 0.599f, 0.812f, 1.0f); waterBuffer.ssrSettings = Vector4(0.5f, 20.0f, 10.0f, 20.0f); waterBuffer.normalMapScroll = Vector4(1.0f, 0.0f, 0.0f, 1.0f); waterBuffer.normalMapScrollSpeed = Vector2(0.01f, 0.01f); waterBuffer.refractionDistortionFactor = 0.04f; waterBuffer.refractionHeightFactor = 2.5f; waterBuffer.refractionDistanceFactor = 15.0f; waterBuffer.depthSofteningDistance = 0.5f; waterBuffer.foamHeightStart = 0.8f; waterBuffer.foamFadeDistance = 0.4f; waterBuffer.foamTiling = 2.0f; waterBuffer.foamAngleExponent = 80.0f; waterBuffer.roughness = 0.08f; waterBuffer.reflectance = 0.55f; waterBuffer.specIntensity = 125.0f; waterBuffer.foamBrightness = 4.0f; waterBuffer.tessellationFactor = 7; waterBuffer.dampeningFactor = 5.0f;
Performance
I haven't made much effort to make this cheap, so make modifications for what's important to you as needed. As it stands, this runs in ~0.9ms on my 2080 when looking full-on at the entire 50x50 plane with the same high tessellation, which is large. No doubt the SSR marching is really expensive, and you get fairly little benefit out of it with water this turbulent, so that would be the first place I'd start making optimizations, or go cheaper with sample count overall, or both. Being more dynamic with tessellation detail would also, of course, make a sizeable impact by putting more detail only when the camera is close enough for it to matter. Dropping the PBR specular would be in the cards too - it's not like I'm making a point to be physically based with this anyway, and Blinn-Phong would probably look pretty close with the same noise trick applied to it.Source
The textures and shader file I used for this post are zipped up and available for download here. Here's a link for just the shader. For simplicity I only added the water shader file and not the files it depends on for basic stuff like normal map unpacking, depth-based position reconstruction, lighting functions, etc, because you'll have your own ways of doing things like this already. If you don't happen to, feel free to reach out and I can send it to you.Resources
-Nathan Reed's Tessellation Modes Quick Reference is a great read to freshen up on tessellation if you haven't done it recently.-Branislav Grujic's Water Rendering in FarCry 5, is an amazing resource to see what some of the best in the business are doing with water.
-Want to explore more physical, believable water? Check out Jean-Philippe Grenier's post on Water Simulation in Real-Time. His work is incredible. The next time I come back to water rendering, I'll be trying to achieve something like this.
-The normal maps I used came from this post.
-The sea foam texture came from Filter Forge.