Cascaded Shadow Maps with Soft Shadows

Post Mortem
I wrote this post back in 2013, when a lot of graphics topics in general were new to me. As such, there are some steps in here that could have been better. I've left it all as it was, but have made notes in a few places to give you better resources to work with. I also apologize in advance for the code being images, I was not at all well-versed in HTML at the time!Overview and Thoughts
Shadow mapping is one of those things that is difficult to be satisfied with. At this point, I've read dozens of articles, papers, blogs, etc. about different shadow mapping implementations, and it quickly became clear that there's currently no perfect (or even near-perfect) way to do them. It is possible to get something that looks pretty good though, and you can use little tricks to minimize the drawbacks. My hope is that by the end of reading this, you'll be able to implement and understand the complete flow of cascaded soft shadow maps, and the advantages/disadvantages to the techniques I use.Here are the major steps covered:
- -Select your camera partitions
- -Create light view projections with texel snapping
- -Render a depth map for each cascade
- -Render to a black/white texture from the camera perspective
- -Downsample
- -Horizontal Blur
- -Vertical Blur
- -Upsample
- -Render Scene
Select Your Camera Partitions
The whole idea of cascaded shadow maps revolves around the desire to cover your camera frustum so that you have shadows on everything you can see. We can't just use one shadow map though, because even with a 4096x4096 texture you would have terrible pixelated shadows near your camera! So instead we split the camera frustum into pieces, allowing higher resolution nearest the camera, and lower resolution farther from the camera.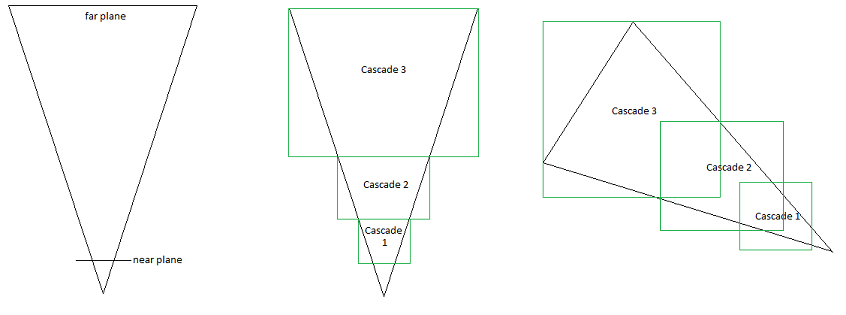
Here is an example of how a camera frustum is split into 3 cascades, and the nature of how these behave as your camera rotates. A common question is "Why doesn't image 3 look like image 2 but rotated?" It'll make more sense later on, but the short-and-sweet answer is because doing it that way would mean changing your light position and/or direction as your camera rotates, which doesn't make sense because that needs to be consistent.
The first step in setting up cascaded shadow maps is to select your camera frustum partitions. Finding how many you want and deciding the depth they cover is completely up to you. It can be arbitrary, it can be the result of an equation, it can be scene dependent, etc. For my case, I'm doing "outdoor" scenes, so I want to cover a large amount of space. I ended up deciding on a camera with a near/far plane of 0.1 and 1000.0, with 3 cascade partitions (3 to 4 partitions is pretty standard). The first split goes from 0.1 to 20.0, the second from 20.0 to 80.0, and the third from 80.0 to 400.0. Anything beyond 400.0 won't have shadows, but for me that's fine because at that point it's far enough away that I don't care. Below is a snippet in my camera initialization that shows how I setup my 3 projections based on my cascades and store them in my camera object. Note that if your FOV or aspect ratio changes during the game, you'll need to recreate these projections to accommodate that.

Create Light View Projections with Texel Snapping
Now that we have our camera partitions, we need to set up our three light view projections in preparation for the next step. What we're basically going to be doing is taking snapshots of our scene by rendering depth from the point of view of the light, once for each cascade. This will give us something to compare to decide what is in shadow, and what isn't. When generating the light view projections for each camera split, the first step is to get the frustum corners. One way to do that is to create the base coordinates for the corners, and transform them by the inverse of the transposed view projection of that camera split. Here's how we do that: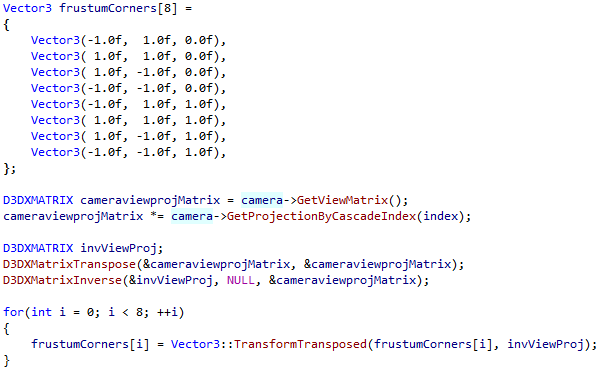
The "index" is an input to this function that specifies which cascade split we want (0 for near, 1 for mid, 2 for far). GetProjectionByCascadeIndex is just grabbing that respective projection matrix (that we created in the previous step) from the camera. We then get the transpose of the matrix because all our matrices that we end up passing to the shader get transposed, so we need to do this for our corners to be consistent with what we use in the shader. Finally, we take the inverse of that view projection so that we can put these corners in camera space. If you don't already have functionality for transforming your Vector3 by a transposed view-projection matrix, here's that snippet if you need it.
Post Mortem Note: I was using the transpose matrices here because that's what my shaders required at the time when I was using the matrices for some visualizers that aren't included in the post. You don't need to work with transposed matrices, your transformations just have to be consistent.
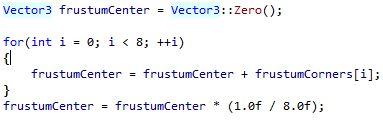
Now that we have the corners, we can get the center of this split:
At this point I'm going to assume that you already have your normalized light direction vector, so below I'm using mine which was passed into this function as "lightDirection."
The next step is to use all this information to create our light view projections while also incorporating texel snapping. What do I mean by texel snapping, and why do we want it? Well, if you look at some of your older games (and probably a good portion of your newer games), and stare at a shadow near your camera, you'll notice that its edges move around. We call this shadow shimmering or shadow crawling, and once you notice it, you realize how ugly it is from a graphics perspective, and how distracting it can be (because, you know, they don't do that in real life). There are two common causes for this which kind of tie into each other.
The first is that the typical way of finding your 'ideal' light projection matrix is to do an offset projection based on the min/max points of your camera frustum split's corners (the ones we just found). The problem here is that your projection size is always changing, and if it's always changing, so will your mapped shadow texels. So instead, we'll get a radius for the light projection by creating a circle around the camera frustum section, and superimpose our projection over that, like this:
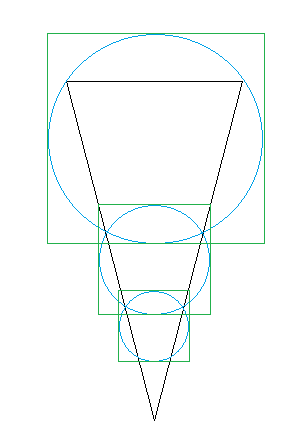
Now, we have a consistent projection size. The tradeoff, as you can see, is that you've now increased the amount of wasted texture space, which means a drop in quality. Not necessarily a ton, but certainly a little, and there may be ways to minimize that but I haven't found one that works for me yet. The benefit of having shadows that don't shimmer absolutely outweighs this, however.
The second cause for shimmering is because the light view projections are constantly moving with your camera, causing the matching shadow texels to change. We can minimize this by snapping the light view projections to texel-sized increments. This neat little trick, in combination with a consistent projection size, gives us stable shadow maps. You'll still see the occasional artifact here and there if you look really closely, but nowhere near the consistent movement that you would see otherwise. Now let's see how it's done!
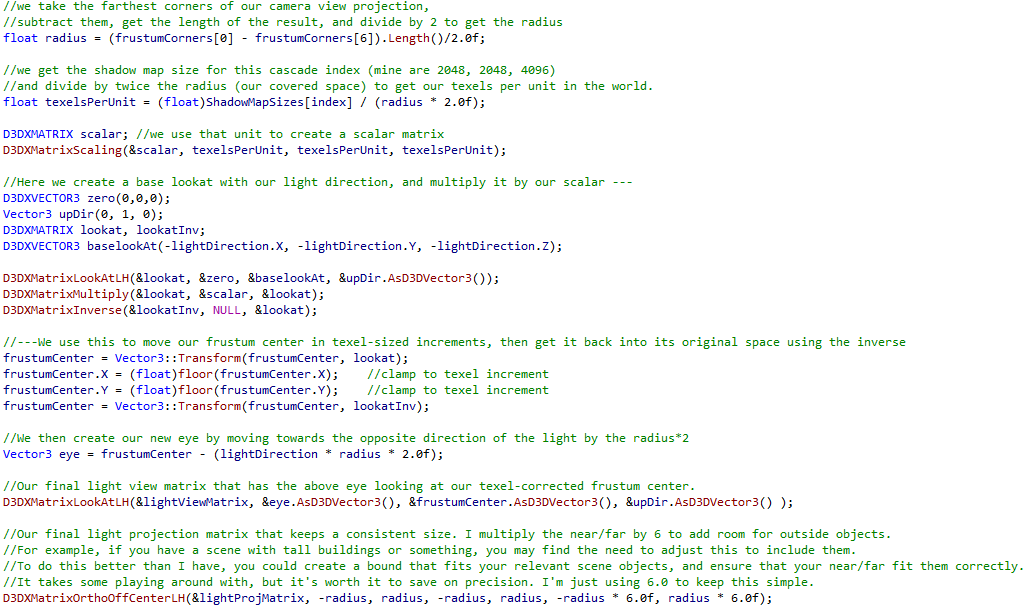
Notice that we're using an orthographic projection matrix for the light. That's because we're using directional lighting, and orthographic projections match the way a directional "sun" type of light behaves. Now that we have a way to create a light view-projection matrix for each cascade, we can move on to the next step.
Post Mortem Note: You don't have to do the near/far stuff I'm doing above. You can do what's often referred to as "pancaking" your shadows, which involves clamping your projected depth position in the shader to the near-clip plane. What I have here is also still viable, given that you may still end up with a bounding box of your considered objects for the purposes of culling anyway, but you can also just do that culling and also pancake for simplicity's sake. It can save headaches. You can also disable depth clipping to avoid issues where shadow casters cut into your shadow camera near plane and cause visual issues.
This is why we want to remove shadow shimmering!
Render a Depth Map for each Cascade
We're now going to need a depth texture for each cascade. To do this, create three render target textures that use the same "ShadowMapSizes", and render your scene for each using a depth shader. Here's a simple vertex and pixel depth shader that I use. Your view and projection matrices for this shader will be your lightViewMatrix and lightProjMatrix from the above, respectively for each cascade. These will be your "screenshots" of the scene that I mentioned earlier, from the point of view of the light. If you haven't done this before, I recommend checking out Rastertek's tutorials on rendering depth and creating/swapping render targets.This is what our three cascades end up looking like when we color each of them.
Render to a Black/White Texture from the Camera Perspective
The next step is to render the scene again from the point of view of the camera using our three depth maps to figure out where our shadows are. See these vertex and pixel shaders for how do to this. The idea is pretty simple. First we check the depth of the position against the depth of our cascades, which is made easier by the fact that we used spheres for the light view projections. Rather than needing to check against the bounds of a box, we can just check against the diameter of each sphere. This tells us which depth map this pixel falls in. If it doesn't fall in any, then it's outside of our depth map bounds and we make the pixel white. If it does fall within a depth map, then we check the depth of this pixel from the point of view of the respective light view projection against the one we got in our "screenshot" depth map from the same light view projection. If our calculated depth is less than the one from the shadow map, then we make this pixel white (if its normal and the light direction are facing each other). Otherwise, it is being occluded by something else or the normal is facing away from the light – in both cases we choose to shadow the pixel.A note on shadow acne and "Peter Panning" - You'll notice that in my shader I use a "shadowBias" value when comparing depth. This is to reduce the chance of shadow acne, which usually occurs because of a lack of floating point precision. This value works pretty well for me, but there are plenty of ways to calculate what you want to use that can also reduce Peter Panning, which is what happens when your shadow bias is too large and creates undesirable gaps between your model and the shadow. In my case, the softened shadows tend to cover up the small amount of Peter Panning, so I haven't needed to go further...yet. Google "slope-based shadow bias" for an example of a common shadow bias equation.
The result of this shader is a black and white texture of the scene from the point of view of the camera that shows where objects are shadowed. We're almost there, but the point of doing this extra step is so that we can blur this texture to create our soft shadows, so let's do that!
Post Mortem Note: Gosh, this next section would have been a lot easier if I had understood that you could do full-screen triangles for setting up the draw and vertex shaders. Alas, I did not know this at the time. If you're looking at this now, you can look at what I'm doing in the pixel shaders, but I beg you to use full-screen triangles instead of what I do below :-)
Downsample
A standard way to blur a texture is to downsample it, which in our case means we're drawing the texture to a smaller render target. We do this for two reasons: one because it makes the end result look better, and two because it makes our next steps much faster computationally. Then, you do a blur on the downsampled texture, and upsample it back to the size it was before. These next few steps are all pretty similar, but let's take them step by step.First, you create a quad half the size of the screen (it can be less/more than that percentage of the screen, it's up to you as long as it's consistent) and place it at the view origin. The view matrix for drawing this will be an identity matrix because we don't need any kind of transformations. Since we're going to be rendering in 2D, we need an orthographic projection matrix for this. This can be done using "D3DXMatrixOrthoLH" with the width and height half the size of the screen, just like our quad, and for now a near and far of 0.0/1.0 should work. To match this, we need to create a new render target half the size of the screen to draw to. Once we have all that, we need to turn off depth testing (see my SRT Tool post for an easy way to do that), and then draw the quad using a simple texture vertex and pixel shader that draws the black/white texture to it, which we pass in. We're going to keep depth testing off while we do all this 2D rendering. At this point, we now have our downsampled texture.
Horizontal Blur
The reason we split blur into two different steps is to cut down on the computational cost of doing this; two linear passes on an image is much faster than a singular circular one. For this step, we’re doing pretty much exactly what we did for the downsample step, but with a different shader. We grab a new half-screen-size render target, reuse the half-screen-size quad and orthographic projection, and draw our quad using a horizontal blur vertex and pixel shader which takes our downsampled texture as input and performs a Gaussian blur on it. My blurring set is just one of many sets out there, so feel free to try different ones online and see which you like best.Vertical Blur
Nothing special here because it’s pretty much the same as the above step. Instead of using a horizontal blur shader, we use a vertical blur vertex and pixel shader which takes our horizontally-blurred texture as input and performs a Gaussian blur on it. New half-screen-size render target, same quad, same ortho projection.Upsample
Now that we have our blurred texture, we need to upsample it back to screen size. To do this we’re basically just doing our downsample the other way around. We create a screen-sized quad rather than a half-size, a full-screen-size orthographic projection matrix, and a full-screen-size render target. We’re going to reuse the simple texture shader from the downsample step, but instead pass in the vertical blur render target texture. This will sample us back up and give us the same black/white texture before, but now blurred!Render Scene
Tired yet? We’re almost there! Now it’s just the final piece. We can start by turning depth testing back on. Now we just render our scene like we normally would - the addition of shadows should plug right into whatever you have. Just pass the upsampled texture into the shader and sample it based on your view position, then multiply it by your output color. To take it a step further, you can add PCF (Percentage Closer Filtering) by just sampling a number of pixels around your shadow sample coordinate and averaging them.Aaaaaaand we’re done! Hopefully you’ve found parts of this tutorial helpful in understanding the shadowing pipeline. It ends up being a much more complex topic than it seems at first glance, and there are still plenty of on-going studies on how we can improve shadows in games, but it’s certainly not impossible to achieve decent-looking stable shadows. Have fun, and good luck!
Improvements
Like everything else, I'm sure there are ways to improve what I've done here. Some that I know of include using bounding boxes to determine how far to extend your light view projections (as I mentioned in that snippet). Another is to use a texture atlas for the depth maps so that you have one texture to sample rather than three. I didn't cover PCF because the topic has been beaten to death in many blogs and forums. This site covers that topic well.Resources
Shadow mapping being the difficult topic that it is, it doesn't help that a lot of papers only provide vague implementation details and show their best-case results without mentioning drawbacks and performance limitations. Here are some sources that I found incredibly valuable:http://the-witness.net/news/2010/03/graphics-tech-shadow-maps-part-1/
http://mynameismjp.wordpress.com/2013/09/10/shadow-maps/
http://diaryofagraphicsprogrammer.blogspot.com/
http://msdn.microsoft.com/en-us/library/windows/desktop/ee416324%28v=vs.85%29.aspx
If you feel like I wasn't clear enough or need to elaborate more about a particular piece, feel free to send me an email with your questions or thoughts!