Area Lights
Intro and Notes
Area lighting can add a lot to game scenes, and with a physically based lighting model, they look even better! In this post, I'll be detailing the implementation of sphere, tube, and one-directional rectangular area lights.For reference, it's worth mentioning that I do all my lighting in view-space, not world space, so you may need to change your implementations accordingly. Also, my methodology for rendering the lights involves rendering geometric volumes in the shape of the light, and large enough to cover its radius, in order to perform the lighting calculations. That includes a stencil pass on the lighting geometry as well, for the purpose of minimizing the pixels that don't need to be calculated. This is a pretty standard deferred rendering practice, and it's out of the scope of this tutorial so I won't be covering it here.
The idea of area lighting is to better mimic the way lighting behaves in real life. Think of a standard point light, and how that model represents light coming from an infinitely small 3D point in space with a particular radius. That still works fine for small light-emitting particles and such, but it doesn't accurately reflect light coming from lamp bulbs, or more complex shapes. Area lighting works by incorporating light shape and size into the equation, and also uses a luminosity parameter to control the brightness of the light within its lighting radius.
Sphere Area Lights
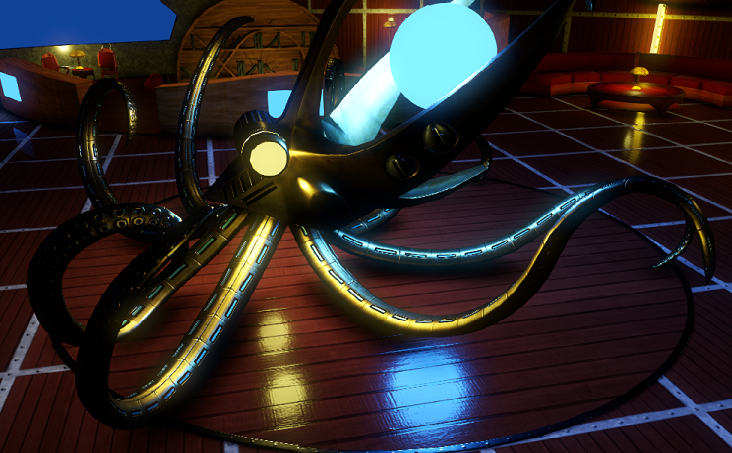
Let's start with sphere area lights, since they're the easiest. You start, as in most deferred lighting, by reconstructing the view-space position of the pixel, getting its normal, diffuse color, etc. from your gbuffer. You can use that view position to get your view direction as well. With all that, we can begin:
float3 r = reflect(-viewDir, normal);
float3 L = input.lightPositionView.xyz - positionView;
float3 centerToRay = (dot(L, r) * r) - L;
float3 closestPoint = L + centerToRay * saturate(sphereRadius / length(centerToRay));
L = normalize(closestPoint);
float distLight = length(closestPoint);
The first two lines calculate the reflection vector and the light-to-point vector for the view direction and position of this pixel. The third line gives us a ray along which we can use to approximate, in the fourth line, the closest point on the surface of the light sphere to the position of that pixel. This is what widens our specular distribution to give us a correct looking specular highlight. Then, we reuse the L variable which becomes the new light direction vector that we use the same way we always do in our lighting equations (NoL, halfway vector, etc) . We also grab the distance to the light surface from that point (distLight) to use later in a couple places.
From there, I calculate my physically-based lighting the same way I do in my other post, but with a couple small differences. In the CalculateNormalDistributionTrowReitz, I pass in the distLight from above and use the sphere radius to calculate an alphaPrime variable below. "alpha" is my "roughnessActual" in the other tutorial, I've just changed the variable here because everyone seems to use that name for that variable.
float alphaPrime = saturate(sphereRadius/(distL*2.0)+alpha);Then instead of pow(roughnessActual, 2.0), I have (alpha * alphaPrime) in that calculation. This gives the proper normalization factor for this light that would be otherwise incorrect in this situation.Everything else in the PBR calculation remains the same. At the end of that, we apply Epic's inverse square formula for the lighting falloff:
float falloff = pow(saturate(1.0 - pow(distLight/(lightRadius), 4)), 2) / ((distLight * distLight) + 1.0);This is where the light radius comes in. We apply this falloff to our final lighting result (it should affect both your diffuse and specular factors), and multiply that by our input luminosity value and light color:
float3 light = (specularFactor + diffuseFactor) * falloff * lightColor * luminosity;Depending on how bright you want the light to be, your luminosity could be very small, or in the hundreds. You can have tiny sphere lights that are very bright, large sphere lights that are dim, and everything in between.
And that's it! Let's move on to tube area lights.
Tube Area Lights
Tube area lights work similarly to sphere area lights; we just have to account for the length of the tube. In the shader, we represent the tube as two end points, so just make sure you get those passed into the pixel shader in whatever transformation space you work in. Again, mine is view space, so in my vertex shader I transform both endpoints into view space. Starting with the same variables, we once again approximate the closest point, but this time on the tube light's surface:
float3 L0 = input.lightPositionView.xyz - positionView;
float3 L1 = input.lightPositionView2.xyz - positionView;

float distL0 = length( L0 );
float distL1 = length( L1 );
float NoL0 = dot( L0, normal ) / ( 2.0 * distL0 );
float NoL1 = dot( L1, normal ) / ( 2.0 * distL1 );
float NoL = ( 2.0 * saturate( NoL0 + NoL1 )) / ( distL0 * distL1 + dot( L0, L1 ) + 2.0 );
float3 Ldist = L1 - L0;
float RoLd = dot( r, Ldist);
float distLd = length(Ldist);
float t = ( dot( r, L0 ) * RoLd - dot( L0, Ldist) ) / ( distLd * distLd - RoLd * RoLd );

float3 closestPoint = L0 + Ldist * saturate(t);
float3 centerToRay = dot(closestPoint, r) * r - closestPoint;
closestPoint = closestPoint + centerToRay * saturate(tubeRadius / length(centerToRay));
float3 L = normalize(closestPoint);
float distLight = length(closestPoint);
You can pretty easily see here that what we're doing is the same as the sphere light case, but we're doing the calculations at both endpoints of the tube, and finding the appropriate point along the tube between the two. In this case our NoL was already calculated as part of finding the closest point. With the closest point and distance to it, we apply the PBR logic just like our other lights. Swap out the "sphereRadius" in the CalculateNormalDistributionTrowReitz for your tube radius and you're good to go! The final lighting calculation should look the same.
Rectangular Area Lights (One-way)
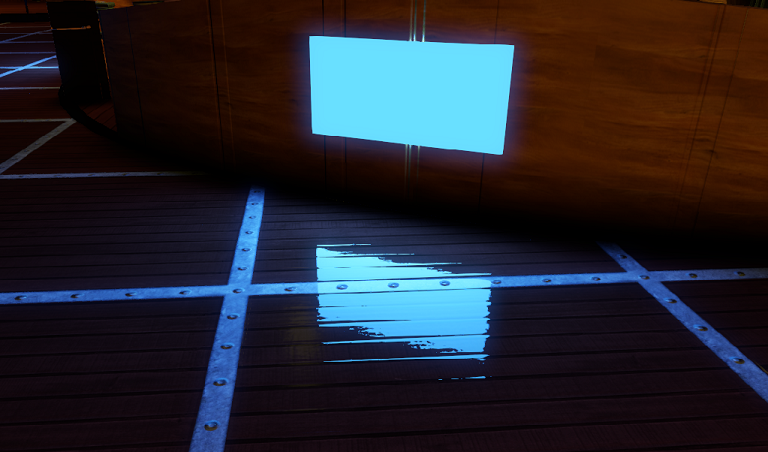
My rectangular area light implementation is a bit less precise, and not really physically correct like the other two are as far as the specular goes. Feel free to play around with this one and see if you can make something that works better. The implementation I have looks good enough to me for the scenes I've been working with, so I've stuck with it for now. There might also be some places that could be improved or made faster.
We start similarly to the tube light, by calculating our four rectangle corners in the vertex shader, and passing them to the pixel shader. Here we find the four light-to-point vectors for each of the light corners, and do a check to ensure one-sidedness of the light direction.
float3 v0 = input.lightPositionView.xyz - positionView;
float3 v1 = input.lightPositionView2.xyz - positionView;
float3 v2 = input.lightPositionView3.xyz - positionView;
float3 v3 = input.lightPositionView4.xyz - positionView;

float facingCheck = dot( v0, cross( ( input.lightPositionView3.xyz - input.lightPositionView.xyz ).xyz, ( input.lightPositionView2.xyz - input.lightPositionView.xyz ).xyz ) );

if (facingCheck > 0.0)
{
return float4(0.0, 0.0, 0.0, 1.0);
}
Next, we approximate the solid angle of lighting by taking the average of the four corners and center point of the rectangle. See the Frostbite paper in
the references section at the bottom of the page for different ways of doing this with varying degrees of accuracy.
float3 n0 = normalize ( cross (v0 , v1 ));
float3 n1 = normalize ( cross (v1 , v2 ));
float3 n2 = normalize ( cross (v2 , v3 ));
float3 n3 = normalize ( cross (v3 , v0 ));
float g0 = acos ( dot (-n0 , n1 ));
float g1 = acos ( dot (-n1 , n2 ));
float g2 = acos ( dot (-n2 , n3 ));
float g3 = acos ( dot (-n3 , n0 ));

float solidAngle = g0 + g1 + g2 + g3 - 2.0 * 3.14159265359;

float NoL = solidAngle * 0.2 * (
	saturate ( dot( normalize ( v0 ), normal ) ) +
	saturate ( dot( normalize ( v1 ) , normal ) )+
	saturate ( dot( normalize ( v2 ) , normal ) )+
	saturate ( dot( normalize ( v3 ) , normal ) )+
	saturate ( dot( normalize ( input.lightPositionViewCenter.xyz - positionView ) , normal )));
That gave us our NoL needed for the rest of our calculations, but we're still missing some pieces for the specular piece of the equation. This is the part where I kind of took my best guess to make it look right. I still follow the idea of the "closest point" to get the specular highlight. To find that closest point, we calculate the light-plane intersection from our view position, light direction, and light position center (note that 'r' is the same as before, and lightDir is the direction of the light plane, calculated in the engine and passed to the shader):
float3 intersectPoint = CalculatePlaneIntersection(positionView, r, lightDir, input.lightPositionViewCenter.xyz);

And here is the function used:
float3 CalculatePlaneIntersection(float3 viewPosition, float3 reflectionVector, float3 lightDirection, float3 rectangleLightCenter)
{
   return viewPosition + reflectionVector * (dot(lightDirection,rectangleLightCenter-viewPosition)/dot(lightDirection,reflectionVector));
}
We then find the difference between that point and the center of the light, and find that result represented in the 2D space on the light's plane in view
space. We then clamp that point within the bounds of the light. The "right" and "up" are the light's right and up vectors based on its rotation, and
lightSizeX/Y are the size of the light rectangle. All of those are calculated outside of the shader and passed in. Make sure that those "right" and "up"
vectors are also calculated in view space, or are consistent with whatever space you're working in.
float3 intersectionVector = intersectPoint - input.lightPositionViewCenter.xyz;
float2 intersectPlanePoint = float2(dot(intersectionVector,right), dot(intersectionVector,up));
float2 nearest2DPoint = float2(clamp(intersectPlanePoint.x, -lightSizeX, lightSizeX), clamp(intersectPlanePoint.y, -lightSizeY, lightSizeY));
This is where I struggled trying to get this to work with our PBR specular equations. I ended up settling for the following approximation because it looked good enough, and rationalized that this was okay because it'd be cheaper than the GGX equations anyway. Knowing me, I'll come back to this eventually to make it more physically accurate.
float3 specularFactor = float3(0,0,0);
float specularAmount = dot(r,lightDir);
if (specularAmount > 0.0)
{
     float specFactor = 1.0 - clamp(length(nearest2DPoint - intersectPlanePoint) * pow((1.0 - roughness), 2) * 32.0, 0.0, 1.0);
     specularFactor += surfaceSpec * specFactor * specularAmount * NoL;
}
Here we just calculate the amount of specular we want based on how direct the reflection vector is to the light direction, and calculate a specular factor
that fades the sharpness of the light based on the roughness value at that pixel. Like I said, it's not perfect, and I'm not sure 32 is the best value to
use there because I only used this kind of light in one scene, but it looks pretty good!
float3 nearestPoint = input.lightPositionViewCenter.xyz + (right * nearest2DPoint.x + up * nearest2DPoint.y);
float dist = distance(positionView, nearestPoint);
float falloff = 1.0 - saturate(dist/lightRadius);
Next we grab our nearest point in 3D space, get the distance of this point to the pixel we're looking at, and apply a linear falloff to the light. I tried a few different falloffs here, including inverse square, but linear just felt like it looked the best for this kind of light.
The final lighting equation is the same as the others, but I'll include it here again:
float3 light = (specularFactor + diffuseFactor) * falloff * lightColor * luminosity;
Final Notes
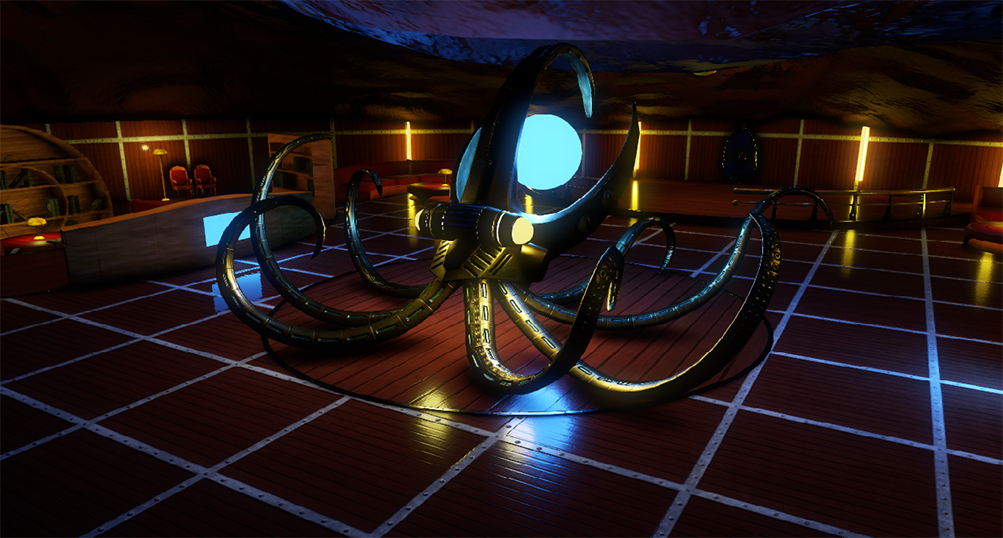
And that's it! You now have three great looking area lights to apply in your scenes! As you've no-doubt noticed, these lights are much more expensive than your standard point lights, so use these with care because they love to eat up GPU time when you have too many, like this demo scene which has about 40 of them in a small space. Most of the time, you want this kind of lighting to be baked to avoid the GPU hit, but real-time lighting is way more fun to talk about so I roll with what I've provided here.Here's a video of the lighting in action. I made this video a little while ago as a progress update on the features I currently support in Eden, but it works well to show them off. Hope you like it!
References
First and foremost, huge thanks to my great friend, Chris Sydell, for letting me use his underwater library scene assets to create this engine demo. You can check out his other work here:http://www.christophersydell.com/
Of course, Brian Karis gets big creds for being a boss and publishing some of this lighting tech information:
http://blog.selfshadow.com/publications/s2013-shading-course/karis/s2013_pbs_epic_notes_v2.pdf
And thanks for the authors of the Frostbite paper for additional area lighting insight:
http://www.frostbite.com/wp-content/uploads/2014/11/course_notes_moving_frostbite_to_pbr.pdf